|
The Xara Xone Workbook - The best, easy and fun Xara X tutorials |
|
|
|
THE XARA CONFERENCES | XARA.COM | XARA ONLINE | GRAPHICS.COM TOP SITES | ALL WORKBOOKS |
|
When this tutorial was first published, just a few days ago, Ms. Guest had insisted that creating multiple drop down menus was not possible. Since that unenlightened observation, we have discovered that it is indeed possible to create multiple drop down menus. As many as you like. Fly out menus as well.
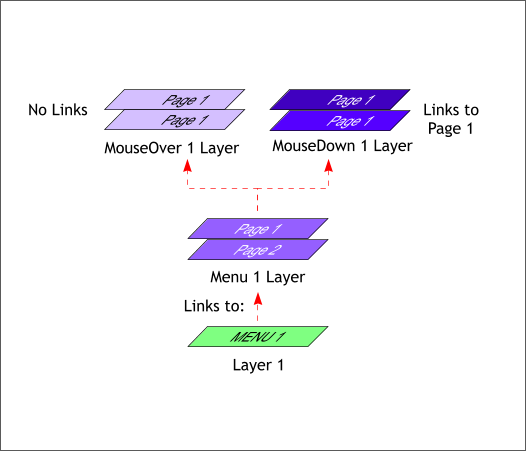
Simply put, each drop down menu will have its own set of layers. Here is the hierarchy for the layers for one button. Layer 1: All of the buttons for the main menu bar (the Normal state) appear when the page loads. Each of these buttons may or may not link to a drop down menu. If there is only one menu item for a button, for example a Contact Us page, the Normal state button links directly to the Contact Us page. Pop Up Layer: In the example above, the Menu 1 normal state button links to the Menu 1 Layer, which is a pop up layer and which displays the drop down menu items. Drop Down Menu Buttons: All menu items on the drop down menu are separate buttons. So if there are two links on the drop down menu, there will be two different buttons on that particular pop up layer. MouseOver and MouseDown Buttons: The two buttons on Menu Layer 1 in the example above link to a MouseOver 1 layer and a MouseDown 1 layer. The MouseOver 1 layer does not link to anything (no MouseOver button should have a link). The MouseDown 1 Layer links to Page 1 or Page 2 in the example above. This will change depending upon the number of links per drop down.
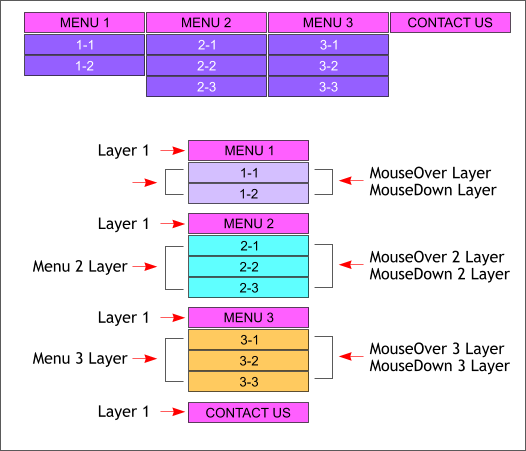
The example above shows the various layers and what is on each layer. NOTE: The MouseOver and MouseDown layer names can have any descriptive title text you wish. But the MouseOver (no space and capitalized exactly as shown) and MouseDown text must appear first followed by a space and your descriptive text. And on the drop down menu layers, each occurrence of MouseOver and MouseDown must have a different name such as MouseOver 2, MouseOver 3, etc. The normal state menu bar shown above has four main buttons. The first three have drop down menus. The last button links to a specific page.
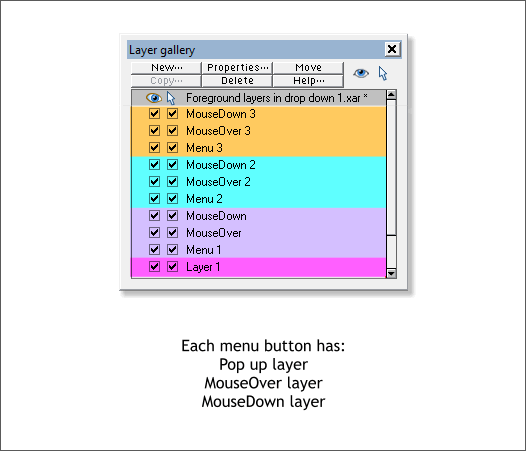
Here is how the actual layers appear in the Layer Gallery. I have colored each group so you can see how they have to be arranged. Layer 1 is the menu bar layer. Buttons on this layer will be visible when the page loads. The three Menu layers contain the drop down menus and appear when the visitor mouses over any of the Layer 1 Menu buttons. The individual MouseOver and MouseDown buttons appear on the drop down menu. The order in which the layers are arranged is the critical part. The pop up layer (in this case the layers titled Menu 1, Menu 2, Menu 3), appear first and then the MouseOver and MouseDown layers above as shown. You can have as many drop down menus as you want, but each must be arranged in the order shown above: Pop Up Layer (Menu 1, Menu 2, etc.) then MouseOver and MouseDown. Click here to see the menu in action.
Creating a Fly Out Sub Menu Sometimes it is easier to have general categories on the menu and then have a fly out menu with more options. This is also called a cascading menu. Fly out menus can link to other pages or specific areas of the page. If you have a long page with lots of text, it is helpful to link to the subtitles or logical portions of the text. TIP: Adding Anchors Anchors are objects on the page or text to which you can link. A series of subheads for example that link to specific parts of the text can be placed on a fly out menu. To add an anchor to text, highlight the text and give the text or subhead a name. You do this in the Name Gallery > New... Then link to the new name in the Web Address dialog. A Fly out menu is essentially the same as a drop down menu. Here how it works
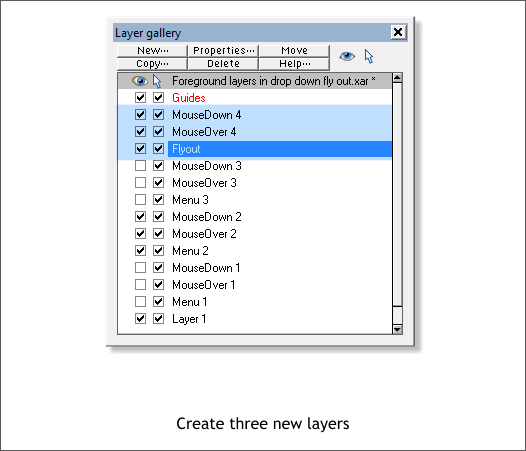
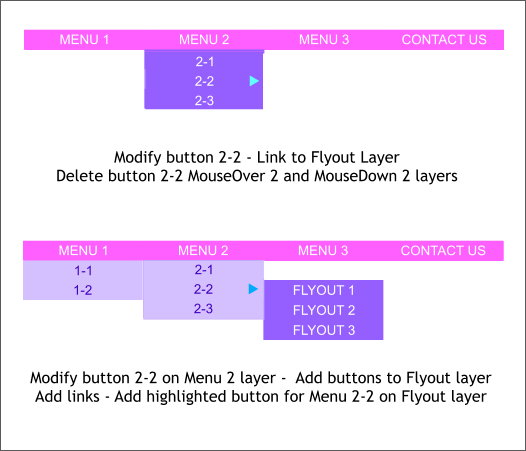
Create three new layers, Flyout, and MouseOver 4 and MouseDown 4.
(TOP) Button 2-2 (Menu 2) will trigger the fly out menu. This is arbitrary. Any button can trigger the fly out menu. Modify the Menu 2 button 2-2 adding an arrow to indicate a fly out menu. Link this button (Web Address > URL: Flyout) to the the Flyout layer. Delete the MouseOver and MouseDown buttons for Button 2-2. (BOTTOM) Copy the modified button 2-2 and Edit > Paste in Place on the Flyout layer. Change the rectangle and text colors. Add the fly out menu buttons to the Flyout layer.
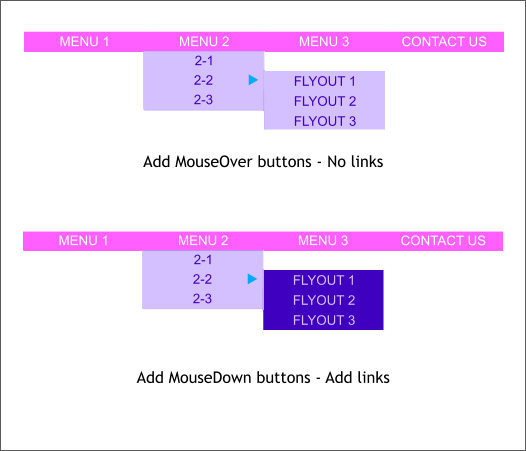
(TOP) Copy the three fly out buttons and Edit > Paste in Place onto the MouseOver 4 layer. Remove the links. Remember, MouseOver layers do not have links. (BOTTOM) Copy and the buttons and Paste in Place onto the MouseDown 4 layer. Add the appropriate links. Click here to see the fly out menu in action. Click here to download two XAR files used to create these menus. And now as they say, Stick me with a fork, I think we're done. Your comments and questions are always welcome. Send your comments to me and I will forward them along to Ima Guest (she's very private and does not like to have her e-mail address passed around—who can blame her, eh?)
|
||||||
|
|
||||||


