


A Tips and Tricks Tutorial By Gary Bouton (Gare on tg)
Big GIFs, Tiny Animations
You’ve probably seen a large image as an advertisement or illustration at the beginning of a blog on the web. And part of the illustration (or photo) moves. Clever! More clever still is that the animated GIF—yes, GIFs are making a comeback on the Web—can be used to demonstrate something with animation only in a small area of the overall image. This means you can make a relative large animated GIF for the Web with a file size almost the same size as a static GIF. Xara Designer has had the capability to set the animation status of objects in a composition to either Background or Overlay, for several versions now—I can count back to version 6 and I’m sure it might be earlier so just about everyone on tg can come play this month. I’ve even brought the toys!
When you choose to Overlay transitions between frame to frame, only the parts that change in the scene are recognized and written to file. The less Xara has to write, the smaller the file size.
Enough talk. Download and open the October 2014 Xara Xone Tips & Tricks Zip archive. Keep these three images handy for importing to a new animation file.
Setting Up Xara for a Custom Animation
To prove a point and be a little obnoxious, I want to go full sail with this Large GIFs, small file size stuff and you’ll be working with a 640 by 468 pixel image, almost a quarter page on a monitor with fairly high display size. Nobody does this, but it’s fun to see what a “motion picture-sized” GIF looks like and how fast it plays when you only animate a fraction of its height and width. But you need to make some adjustments to the options and features in Xara to make the finest animation, so…
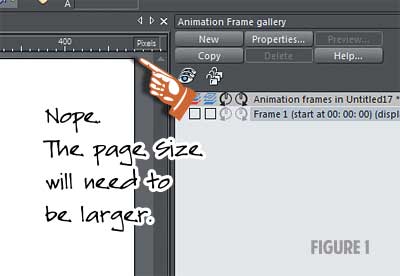
Choose New>Animation. If you like at this point, press
Ctrl+Lto display the rulers. In Figure 1 you can see that the default Width for an animation is about 480 pixels wide and the height won’t cut it either for this animation.
-
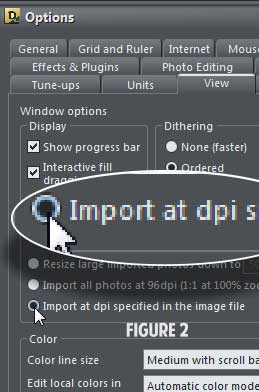
Press
Ctrl+Shift+Oto open the Options box. Click theViewtab and then click theImport at DPI specified in image fileradio button; clickApplyand thenOKto dismiss the box.
-
Press
Ctrl+Alt+Ior your favorite method for importing something. Choose the 2 Pumpkins.jpg image in the Import File dialog from wherever you left in on your hard drive. And the image will land on the page and part of the pasteboard. -
With the Selector tool, drag the pumpkin image to align with the top left of the page.
-
Choose to view this file in Wireframe Quality mode; drag the slider for View Quality on the Stand bar all the way to the left.
-
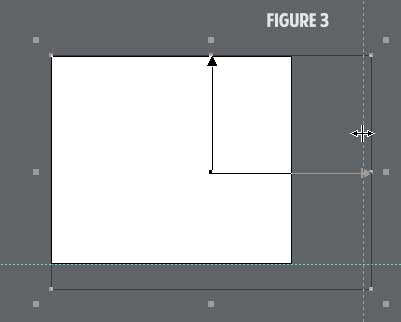
Drag the page borders at bottom and left outward until they snap to the wireframe view of the pumpkin bitmap. See Figure 3.
-
You’ll notice that because you chose a new Animation-type file, that you now have another bar across the top of the interface, and the Animation Gallery popped out. With the pumpkin image selected—here’s the “make it or break it” step—click
Propertieson the Animation Gallery. Oh, you can go back to high View quality now. -
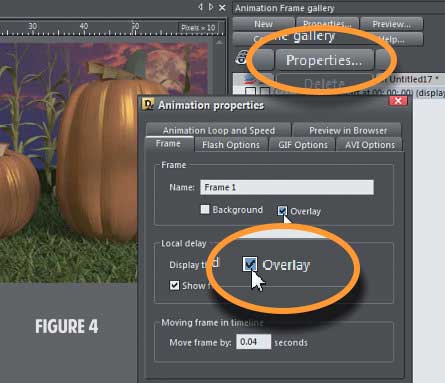
In the Animation Properties box, click the Frame tab and then the Local Delay area, click the Overlay button, as shown in Figure 4. Cheering breaks out in the street, enemies become best friends! You’re over the hump in this sophisticated GIF animation tutorial, and the next real thrill (if you found this step thrilling) will be watching the finished movie.
-
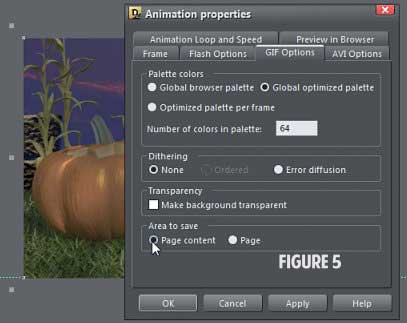
Click Apply and then move on to the GIF Options tab where you have some “Honey, I Shrunk the File Size” antics to perform.
-
Palette Colors? Click the
Global optimized palettebutton. The GIF image file format doesn’t use color channels; it uses a maximum of 256 colors in the file header’s lookup table, and we call this Indexing. By choosing this option, Xara looks at the overall animation, every frame and every pixels, and will choose the best explicit, indexed colors to approximate the original colors in the file, helping to ensure that the file is both small and rich in colors. -
In the Number of colors in palette, type in
64. That’s not a lot of colors, is it? However, when you see the finished animation, you’ll realize that this is a dim scene, basically shades of blue and orange and even only 64 colors can express a copy of the original image quite well.
NOTE: Bouton, why the heck did you choose 64 and not for example, 63 or 57, which is how many varieties Heinz used to have, also a good small number? Well, I was taught early on at the dawn of the computer that computers “like” binary info that is broke into chunks that are multiples of 8; we used 8-bit computing back when the first 286 computers and trains were invented and buffaloes roamed freely in Times Square. 8, 64, 128, 256, 512—you’ll see these “magic numbers” a lot in options boxes even today. And what is Windows 8.1? You got it; it’s a 64x operating system.
-
Dithering? Choose
None. Dithering spreads the errors in color calculation evenly across an optimized image so it looks better, but at the price of a larger file size. Because the files I created in this example are low frequency—there are no abrupt changes from one pixel to a neighboring one—the images will look just fine with not dithering and hard transitions between neighboring pixels. If you think you see some artifacting in the final exported GIF, I suggest you up the number of colors instead of using Error Diffusion dithering. Dithering is probably best for large files that are not animated. -
Wow, I need to break this section up or start a new part; a good author doesn’t go above 10 steps or so in a written tutorial. Okay: Don’t choose Make Background transparent because there’s nothing transparent in the background image, and checking this option adds to the saved file's size, which makes it play slower on slow computers and people hate you for doing this. Choose the Page Content in the Area to Save, um…area. This confines the transparent PNGs you’re going to bring in only to the non-transparent areas and really keeps the files size down. Click
Apply, clickOKas illustrated in Figure 5, and I’m sorry I ran out to 13 steps here. PressCtrl+Sto save your work and keep it open.
Adding the Animated Part of the File
I could have provided only the pumpkins image and the PNG of the faces lit up, and merged the faces with no lighting directly onto the JPEG pumpkins image, but I thought it would be more fun if you had the opportunity to design your own pumpkin faces on blank pumpkins. You’re on frame one of the animation, your outfielder isn’t watching the guy on second base, so let’s get to work:
-
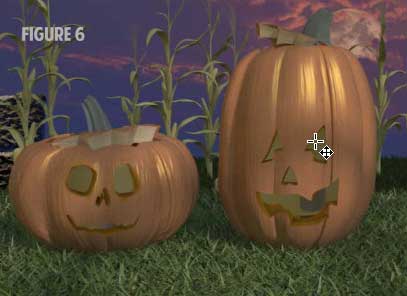
Import the Pumpkin Lights Out.png file and then with the Selector tool, position the dimly lit faces in the appropriate area on top of the pumpkins, or if you’re mischievous this time of the season, put them in inappropriate areas. Or design your own faces using Xara’s drawing tools; it will not impact on the file size we’re striving for using my bitmap artwork. See Figure 6; this is where I myself put the faces.
-
This represents your first frame; all the content is in position. Now click the Copy button on the Animation Gallery and Frame 2 is created and is the current frame. And now you’re going to light up these little guy’s downtrodden faces, to mix metaphors.
-
Import the Pumpkin Lights Lit.png file. The lit up smiles will probably not land perfectly on top of the dim bitmap because you moved the dim one. No problem; these two face files are almost identical in height and width. Go to Wireframe View quality again, and then perform some coarse alignment with the Selector tool. Then go back to High quality view and use the keyboard’s arrow keys to perfect your alignment work. The closer you zoom in, the quicker you’ll accomplish the alignment.
-
Press
Ctrl+Sto save your work. Yeah, yeah I know,Ctrl+Sall the time is from a “Computers for Idiots” book, but I had a “power interruption” because the guys at out utility company here in town think that when they get the power back on, computer users can just pick up where we left off. Yeah. Right. And you can get a cup of coffee at Starbuck’s for 99¢.
Previewing and Exporting your file
You have a finished animation now, believe or not. The transition from frame to frame is at the default of half a second, and the default playback of repeating continuously (IOW forever) so the animation itself is serviceable if not elegant. It’s sort of a warning light on a highway, except it has two foolish faces instead of LEDs.
If you like, you can choose Properties on the Animation Gallery and refine your animation, although the saved file size might become larger than I’m targeting in this tutorial. Click the Animation Loop and Speed tab to lengthen the transitions and how long it plays; you can also double click a frame title on the Animation Gallery and set the duration for only a specific frame. This is how you might accomplish a flickering effect. You could Copy the frame where the lights are on with the pumpkins, choose the Transparency tool, and decrease the opacity of the lit faces.
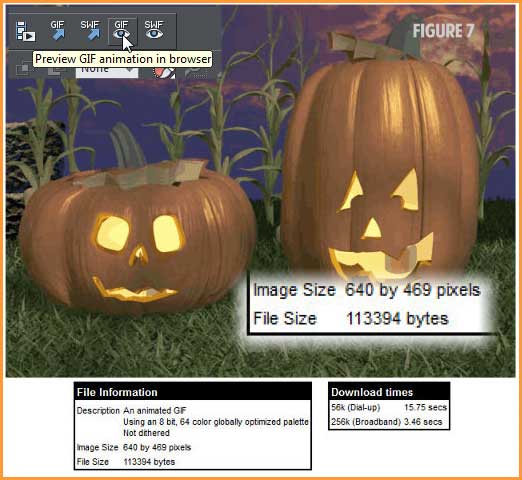
To preview your animation, click the Preview GIF animation in browser button on the Animation bar, as shown in Figure 7. Also note in this figure that the saved animation is a little more than 100K, which a decade ago would be rude and presumptuous to put on the web. In 2014, however, the saved file size is a tad on the large size for an entire page of graphics and text, but c’mon; this thing is huge, it animates and the finished file you’ll see shortly here is a slightly smaller version which means a smaller files size and you can do this by setting up a smaller page size when you begin a new animation.

A Summary Should Go Here
If you’d like a sort of validation for all your hard word, try this: select everything on the page, press Ctrl+Shift+E to export what you’ve selected. Choose GIF from the Save As Type drop-down list, and then in the GIF Export Options box, type 64 in the Max colors box, set dithering to None, click Preview, and then click Export. See Figure 8.

Me, I got a 110K…for a GIF image that doesn’t move. For 3 more kilobytes—I don’t think you can save your name in PC Paintbrush for under 3K—you can have the same image, same number of colors, with the extra added attraction of motion.
Now that you know how to bring your GIF animations up to par with the pros out there, who have been doing this in much more expensive software programs for the past couple of years, would you be interested in a tutorial on creating a cinemagraph? A cinemagraph is a very short video, perhaps a cycle of motion or a back and forth (a “ping-pong”) using still frames of no more than perhaps 10 in number. Let’s talk about this in the discussion area for this month’s Tips and Tricks tutorial.
Here are two examples of the subtly beauty of selective animations of actual film that cinemagraph gurus describe as something more than a photo but less than a video.
Discuss and ask questions about this tutorial on TalkGraphics.com.
The tutorial Big GIFs, Tiny Animations including the artwork and the downloadable examples file are Copyright © 2014 Gary Bouton. All Rights Reserved.


