


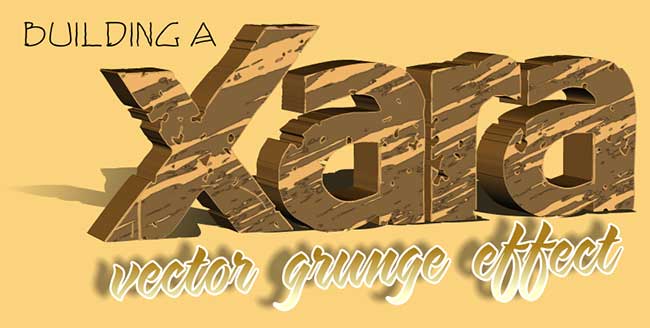
Building a Xara Vector Grunge Effect by Bob Taylor (iamtheblues)
XARA logo downloadYou’ve probably seen a distressed effect as though an object was antiqued by pounding it with a hammer, and leaving it out to rust. The effect lends a sort of authenticity and down-home-goodness (!) to brand name logos such as Country Time Lemonade and Pepperidge Farm, and the effect usually is accomplished by using noise in an expensive bitmap editor such as Photoshop.
This month’s technique brings this effect back home—to Xara Designer—as I show you in a few simple steps how to achieve a “grunge” look to shapes, except you’ll do it entirely with vectors, which can be scaled smoothly, unlike bitmaps.
Now, Xara just had its 30th birthday a little while ago, so let’s use a rough copy of Xara’s logo as the subject of this grunge experiment. Within this file is not only the logo in vector format, but also a group of shapes that represent wood, and a bitmap of wood—I’ll explain what the wood is for later.
Draw your own version of the Xara logo, or create a logo you want to distress, or you can download the provided sample file, but only after agreeing to send large, non-sequential bills to Bob Taylor’s bank account.
( Editor’s Note: No, you don’t have to, ignore Bob’s self-serving plea).
If you are making your own version, well, good for you. Again, you don’t have to stick to the Xara logo, you could use a design of your own. Whichever you choose, begin by giving your logo or other shape a solid black fill. Now, with the Contour tool, create a very small outer Contour: it your logo is about 400 pixels wide, specify 1 step and about a 1 pixel Contour—you can easily do this by entering values on the Infobar. I recommend your working area is white, so the Bitmap Tracer will be less likely to throw some unwanted colours into the mix when you use it. See figure 1.
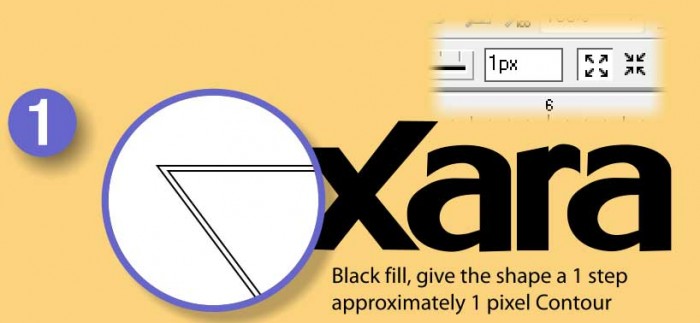
- Figure 1
Next, with the logo selected, choose the Fill tool, and then choose Plasma Fill from the Fill Type drop-down list on the Infobar. Now the background of the logo is black with white speckles in the foreground, but the white areas aren’t sharp enough in detail and they’re too small. This is where knowing how to set the roughness and resolution of fractal fills helps. The trick is: with the Fill tool cursor, do not click on the fill handles which control scale and rotation, but instead click on the shape itself, and surprise, the Infobar now has two new fields you can fill in! Use these values: dpi 350 and Fractal Scale 30. See figure 2.
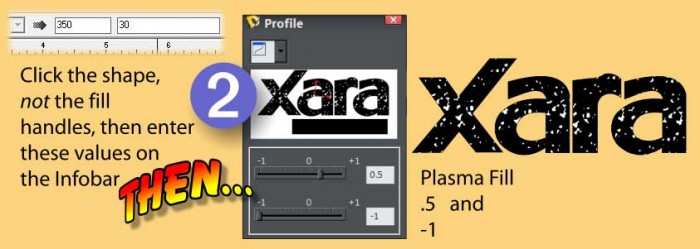
- Figure 2
You will also see the Profile Arrow on the Infobar (it’s filled with pretty halftone dots); click it to open the dialog box, and then enter these values: 0.5 and -1. Check out figure 2 so that you enter them in the correct boxes. You can experiment with these settings if you want your result to be more (or less) grungy.
Now, right-click on the plasma filled shape, and on the context menu select “Create Bitmap Copy…” the three dots is nature’s way of telling you that another dialogue box will open as a result. The reason you need a bitmap copy of the logo is for tracing—Xara’s native Bitmap Tracer will not work on fractal-filled shapes because they are a property in Xara that can be dynamically changed. You need a bitmap, a computer graphic that is resolution-dependent, cannot change, and the Bitmap Tracer can use.
In the Palette Options tab, choose True Colour from the drop-down menu. Next, click on the Bitmap Size Tab and type in 300 dpi. in the DPI Box. Now click on the Create Button and you bitmap will appear, it is already selected for you. As long as this document is open and/or saved, this bitmap copy remains in the the document, not on the page, but in the Bitmap Gallery, so you can press Delete or Backspace on your keyboard to get rid of the bitmap on the page, but it’s still in the document. I’ll show you in a moment how to access it for the tracing procedure on your keyboard.
Go to the Utilities Menu and select “Bitmap Tracer…” and the Bitmap Tracer dialogue box opens. There is a drop-down button below the left preview pane, and it’s marked Default, drop it down and then choose Bitmap 1. You’ll see it in the left preview pane now. In the drop-down below the bitmap, choose Limited Colour from the drop-down menu. Next, one at a time, drag the sliders so that settings Remove Noise is at 100 and Minimum Area is at 50. Final colour tolerance should be at 100, Accuracy 100, and Smoothing 100. Next click on the trace button and after a moment or two the result is shown in the right hand panel; see figure 3. You now click on the Insert button and your vector version will leap onto the page. If it by chance misses the page when it leaps, pick it up, kiss its forehead, tell it to stop crying and you’ll give it a nice boiled candy.
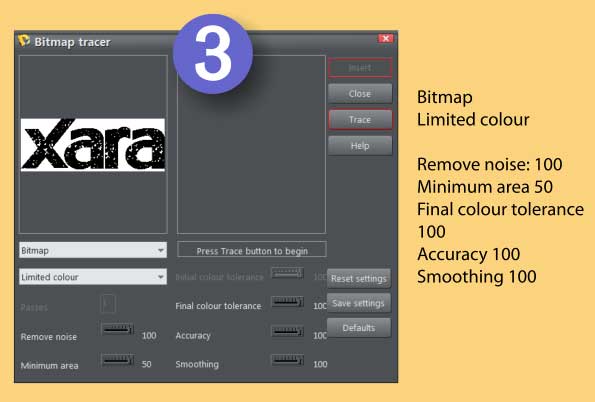
- Figure 3
Okay, enough for gratuitous humor. Ahem…
This vector group needs to be ungrouped, but first make sure that the group isn’t sitting over any other shapes on the page, because once ungrouped, there will be lots of small objects loose on the page and you don’t want to pick up anything not part of the vector trace during the next stage. You might consider using the Page and Layer Gallery to create a new layer or even an additional page for the steps to follow. So, having ungrouped the traced objects, select the white area and delete it. There may be a few white shapes left, which you can select and group and then group them with the black shapes and fill all shapes with black.
You could call it a day and your finished logo looks like that in see figure 4,but if you’d like to be super-ambitious and recreate the stunning wood-like logo shown at the top of this article, here’s the outline for the steps you need to use:

- Figure 4
- Copy your distressed vector logo to a new document so there’s no havoc to wreak with zillions of ungrouped shapes.
- Open Xara™ logo.xar and copy the bitmap image. Close this document if you like (you’re done with it), and then paste the bitmap into this new document that contains the distressed logo. Move it out of the way, to the pasteboard, you can even scale it to a small size if you like.
- Select the vector logo, choose the Fill tool, and then choose Bitmap from the Fill Type drop-down on the Infobar. Choose the wood bitmap image from the Bitmap Name pop-up list on the Infobar, the guy with the thumbnail previews. The logo is now filled with the bitmap of wood.
- Choose the Extrude tool, and then extrude the logo. The face will be this nice wood color, but the sides will be default white.
- Click the Color Editor icon to the left of the color palette, and then choose Local Line Color from the drop-down list at top. Choose a nice medium brown and surprise, the sides of the extruded logo are now brown. Sadly, you can’t fill the sides of an extruded object with a bitmap in Xara. Then again, many of us can never find true Happiness, so the jazz with the extruded sides is a competitively minor inconvenience.
- Choose the Shadow tool, Choose the Floor Shadow (the third from left button on the Infobar now), and then drag the shadow around on the page until it looks right.
You now know two approaches to creating a grunge logo; the 2D method lets you scale the logo to any size you need for output, and the 3D version depends on the resolution of the bitmap you use for the face of the extrude. The big point of this lesson is that you don’t need to depend on bitmaps and bitmap editors to create something that looks organic and natural in appearance. You have all the resources you need right in Xara.

was born in the middle of the last century. The son of a sharecropper mother and a bootlegger father who both died when he was five years old in a bizarre accident involving a whiskey still and an eleven foot sack, was raised in a home for wayward children on the banks of the Mississippi Delta.
With this background he was destined to become an Emergency Service Controller for British Gas in Bath, Somerset, England. Because he suffered from an undiagnosed affliction later described by physicians as “a real attitude”, he was pensioned off with some relief by his employers, as he was constantly in hot water for shouting at, and roundly abusing customers on the telephone.
He decided to move to Spain and settled in a remote village in the shadows of the foothills of the Alujarra Mountains, not far from Mecina Alfahar. Whilst out walking one day, he found a discarded copy of Xara Xtreme 5, The Official Guide…the rest is history.
The tutorial Building a Xara Vector Grunge Effect including the artwork and the downloadable examples file are Copyright © 2012 Bob Taylor. All Rights Reserved.


