


A Tips and Tricks Tutorial By Frances Proctor (“angelize” online)
Organizing a World of Colors
Organizing a World of Colors
You’re a designer or artist, you want to get that idea out of your head and down on media, so you don’t want to wade through a bunch of colors you don’t need. In Xara Designer, it’s easy to winnow down or beef up the available colors and have them right at your cursor’s tip. There are two basic ways you can create groups of colours in Xara; they are colour palettes and colour schemes. So what’s the difference?
-
Colour palettes are basically sets of colors that have titles such as RGB (178,101, 48) or descriptive names such as Deep Blush that you can see if you hover over a swatch. The names for swatches in a specific palette depends on the program you used to create the palette file; you can name colors in Xara, however, you cannot export a collection of swatches as a palette file. You can do the next best thing, though: if you’ve named a bunch of colors and they’re on the color line in a document, save the document as a template and the colors will travel with the file.
You can bring color palettes into Xara a couple of different ways to use them in your designs. You can even keep a specific palette on hand if you make the palette part of a Xara document template. Colour palettes can also contain named colors—be the names in English or color values (RGB, HSV values and so on), just like a colour scheme.
-
Colour schemes are special Xara documents that you can use to recolour a document that you have already designed. Colour schemes were introduced as a web design feature, but they are not limited to just websites. There is a fantastic breadth of opportunity to recast colours in a document, and schemes—within which are named colours—when you know how to bring a special document into the one upon which you’re currently working.
Colour Palettes
Xara can import and use 3 different colour palette file formats .jcw, .pal, and .aco. Color palettes with any of these extensions can be installed into Xara by copying and pasting them into the Palettes folder which is located in the Xara program folder. The path to that folder for the 64 bit version of Xara Designer Pro X10 for example, if you let the program do a default installation, should be this: C:\Program Files\Xara\Xara Designer Pro X10\Palette. Other versions of Xara of you may have are also found in the Xara folder.
This copying and pasting method installs the palettes into the colour gallery and your current colour line for your document does not grow to the right—in other words, the palette is not automatically added to the colour line.
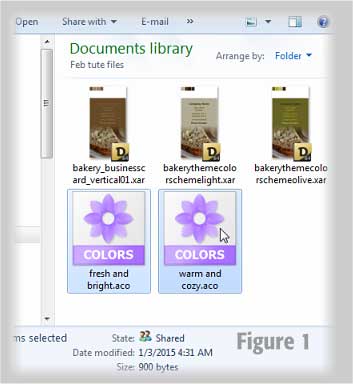
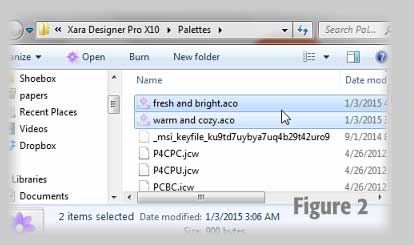
Copy the two .aco files you downloaded and unzipped to the clipboard as shown in Figure 1, and then navigate to the Palettes folder, and finally, paste them into it, as shown in Figure 2. That’s all there is to it, and the next time you open your Xara product they will be available in the colour gallery.
The colour gallery can give you organized storage for colours and all it takes is a simple double-click to import a colour from the colour gallery into your document as a named colour.
Here is a link to a site, Just Jaimee, which has a slew of attractive and interesting .aco colour palettes. These .aco files work in Xara as well as Photoshop so don’t be put off by the site’s page title.
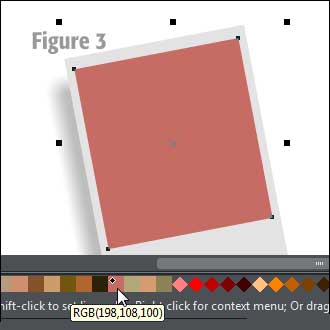
A second method for importing palettes into Xara is to drag and drop the palette file into a Xara document, onto the page. Just make sure not to drop it on the colour line. Try it with one of the supplied palettes all of the colours will be imported as named colours. See Figure 3; the imported colour’s name is RGB (198, 108, 100).
Colour Schemes
Colour schemes are a way to create alternative sets of colours for a document. The alteration can be so significant, it’s like you’ve created a different version of your work. Most of the website templates in Xara products come with alternate colour schemes. However, they’re easy to create by yourself, and even easier to use. The secret is in the naming of the colours and the colour scheme documents.
-
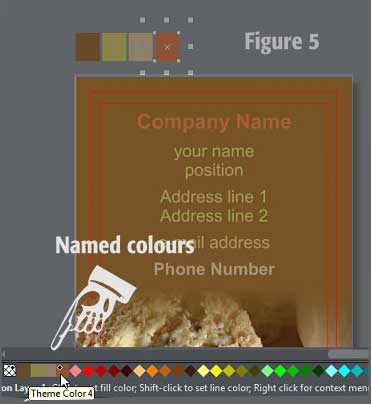
Open the Bakery Business Card.xar document included in the zipped tutorial files. You’ll notice that this document has 4 named colours: Theme Color 1, Theme Color 2, and so on. These names are important: each colour in your document that you want to be changeable with a colour scheme needs to be named just like this—with no u in the word Color. You must use the US spelling of the word Color even if you live outside the US and use English (U.K.) as your Spell Checker language locale. Otherwise the colour scheme won’t work. See Figure 5.
-
The named colours are the first part of the equation. In the bakery business card, select all
CTRL+Aand copy to the clipboard,Ctrl+C. -
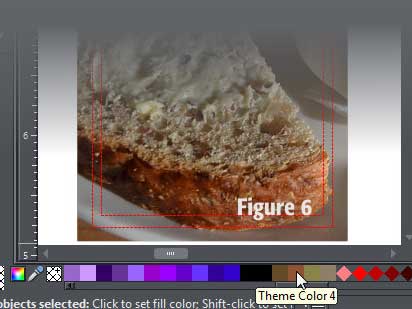
Open a new document and paste everything into this document. All you really need are samples of your named theme colors but it’s easier to make sure your new theme is going to look good if you have the whole layout. And for this tutorial you are going to take your new colours from the bread photo. In Figure 6, you can see the colour line scrolled to the end of the default colour palette, and yes, indeed, the named theme colours have been imported.
-
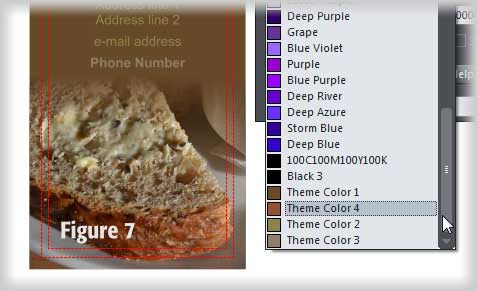
Open the Colour Editor; at the top, click on the dropdown list to expand it, and scroll toward the bottom of the list. You will see the four named theme colors listed there, as shown in Figure 7.
-
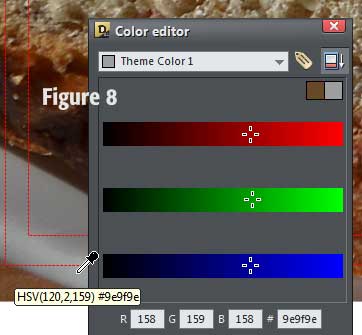
Select Theme Color 1, and then select the eyedropper from the Colour Editor and sample a light grey colour from the plate. See Figure 8.
-
Next, choose Theme Color 2, and sample another colour from the photo. You can continue on and change all four colours if you wish. You can even play around with the Colour Editor and experiment with different colours.
-
Once you are happy with your new theme colours, it’s time to name and save your new colour scheme. Your document name needs to include the phrase themecolorscheme—this is how the “magic” happens. You can have descriptive phrases before and or after the themecolorscheme text snippet. For example, the colour theme you just created could be named bakerythemecolorschemegrey. Just make sure it has themecolorscheme as part of the name Another reminder is good here: the word color is spelled without the u; this is necessary to allow the scheme to work.
-
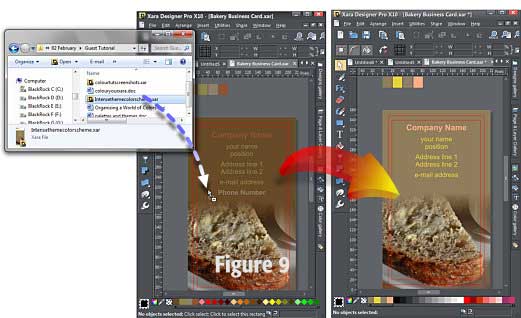
Once you have saved your new theme, open an Windows Explorer folder and file window and drag and drop your new colour scheme onto your original document and watch the colours change! In Figure 9, the special themecolorscheme name tells Xara to change any colours in the original to the colours associated with the same color theme names in the colour scheme document.
You could create a bunch of colour scheme documents and save them in a folder and add that folder to your Designs Gallery. The main thing is to use the Color Theme names for your colours and themecolorscheme as part of the document name.
Enjoy!
PostScript:
If you’ve never tried out the process of defining a named colour, now’s your big chance. It takes only a moment and contains the power to dramatically alter illustrations at any time.
-
Create a shape and then with the Colour editor,
Ctrl+E, mix up a fill colour you want to use frequently in the composition. -
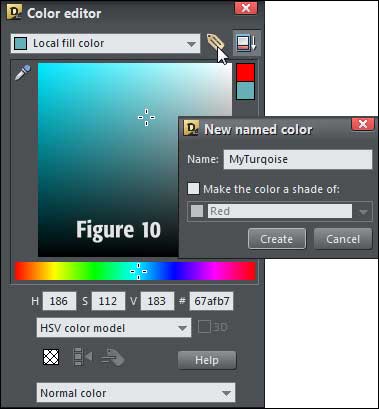
Click the tag icon, as shown in Figure 10. A dialog pops up where you get to type the name of your new colour. Type your name in and then click Create.
-
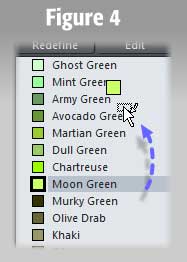
Fill a few shapes with your new named colour, and now why not change the named colour? With no shapes selected (press
ESCto deselect everything). Then display the Colour editor, and then click the drop-down list at top to display the list of named colours. Click on the name of the colour you want to change, as shown in Figure 11. Then use the hue slider or other color component controls on the Colour editor to change the colour definition of the named colour. All objects tagged with this named colour as a fill, outline, or other colour component will change accordingly.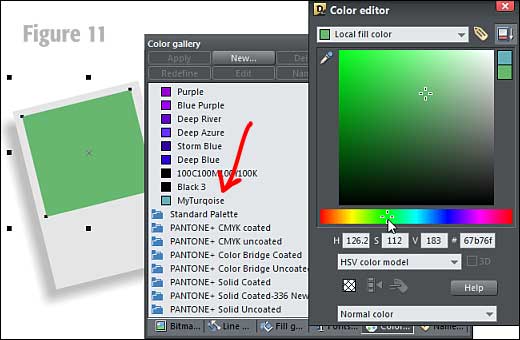
To show how you put put colour themes and named colors to good use in your artwork or to discuss this tutorial go to the thread for this tutorial in the Xara Xone forum on TalkGrapics.com.

(Angelize online), is the co-publisher of the weekly, Good Morning Sunshine! that has brought a smile to the faces of print and online subscribers for 14 years. She uses Xara products extensively in her work for her firm, SunWings Graphic Design. She loves to teach and share her love of Art though her YouTube channel, her contributions to The Xara Xone and her work on Xara’s TalkGraphics forum as a moderator. You can drop her a line through her website or better yet stop by the Xara Xone forum on Talkgraphics and chat with Angelize there.
The tutorial Organizing a World of Colors including the artwork and the downloadable examples file are Copyright © 2015 Frances Proctor. All Rights Reserved.


