


The Color Select/Erase Tool
If I had a dollar for every person who asked, how do I get rid of the background behind a bitmap image, I could have retired many years ago. Until now the answer has been to either draw a vector masking shape around the image to be retained and to use Intersect Shapes, or Apply Clip View to add a vector mask, or to use Mehdi Eraser Classic in the Live Effects Tool.
Well now there is an easier way. And a much more powerful way because you can not only drop out any background color, you can drop out a bunch of colors and they don’t even have to be related in hue.
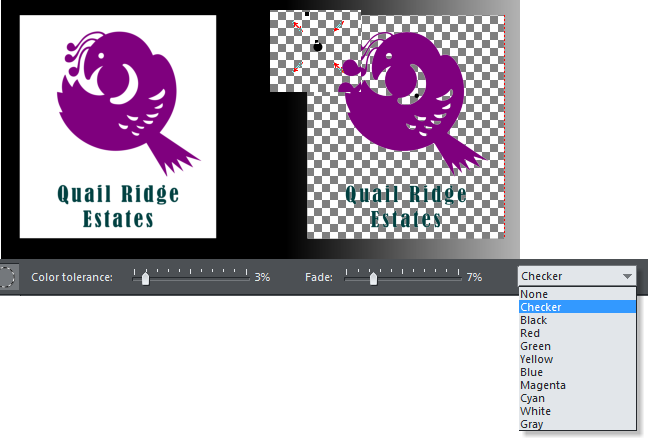
Figure 26
In the simplest example, like in Figure 26. we have a two color logo on a white background. Select the Photo Tool > Color Erase Tool, and click on the white background. A Color Marker appears which is a black circle with four resizing arrows. This color marker selects the color or colors you wish to erase or select. You have a choice of backgrounds as shown in the drop down list to reveal the amount of color erased. You can increase or decrease the Color Tolerance and Fade slider setting to expand or limit the range of colors.

- Figure 27
If your bitmap has a colored background or in the case of Figure 27. shown above left, a mottled background, you may need more than one Color Marker. I used three markers and added a drop shadow to show how effectively the mottled background has been removed. (A Color Marker is added every time you click a color. Markers can be edited separately and can be deleted.)

Figure 28

Figure 29

Figure 30
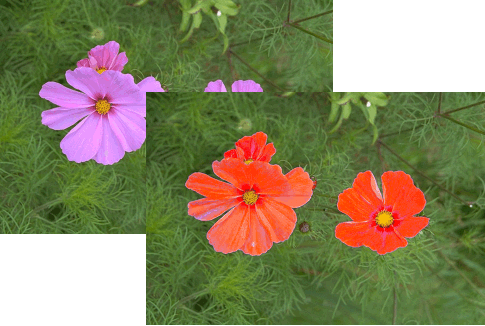
Figure 31

Figure 32
More Photo Tool Stuff
The Panorama Tool Now supports up to 8 images instead of the previous maximum of 6.
Photo Replacement is now “smarter”. In previous versions, if you had three instances of the same photo on the page, and if you dropped a new photo onto one of those three duplicate images, all three would change to the new image. Now this only happens if the duplicate photos are part of a soft group.
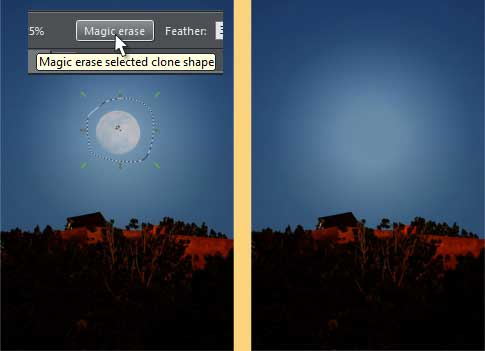
Figure 33
In version 8, however, there is a significant improvement to the Clone Tool as well as the Magic Erase feature. The Clone Tool has been improved so it now uses current result photo as the source, instead of the original photo (for manual and Magic Erase clone objects). This makes it more WYSIWYG in that when you’re cloning or copying (or Magix erasing) an area then it uses the current visible edited picture as the source, and not the unedited original image as previous versions did.
Clipart, Widgets, Buttons, Banners and Bullets,
Templates Galore, Everything But the Kitchen Sink!
I could (and often do) spend hours looking at all the really excellent clip art that is included in Xara Designer Pro X and Xara Photo & Graphic Designer MX. There is something for everybody here and you can use the clip art and templates for printed documents or websites or presentations, you name it.

There are more Widgets like the Twitter feeds, and time displays than you can shake a stick at, though why anybody would shake a stick at a Widget, especially an expandable one, is beyond me.
Decisions, Decisions
With so many new and improved features, I’m surprised you have not already downloaded your Free trial copy. The only real question is, do you need Xara Designer Pro X, with all the bells and all the whistles, plus a bit more, or can you get by with Xara Photo & Graphic Designer MX? It’s a hard decision to be sure. Both contain excellent tools for creating illustrations, printed documents, editing photos, creating website graphics and creating sophisticated websites and presentations. If you consider yourself design challenged, not to worry, there are enough pre-designed objects and professionally designed templates (that you can use off the peg or modify to your heart’s content), that you will look like a professional with major design school education at that!
If you are undecided about which version is right for your needs, see them side-by-side in a Xara Photo & Graphic Designer MX / Xara comparison chart.
If you need help or have questions, visit the TalkGraphics Xara Graphics Chat forum. It’s free, the members are nice and always helpful. In most instances you’ll get an answer to your question in less than an hour and often in minutes.
Thanks for reading. See you on TalkGraphics.com


