|
|
|
|
|
||||
 |
|||||
Creating a Mirrored Reflecting Ball |
|
In this tutorial we'll attempt to recreate the look of the Victorian reflecting ball from the bottom of Page 1. Those of you who have done some of my more recent Xara X tutorials will be familiar with this technique for creating a fisheye lens effect.
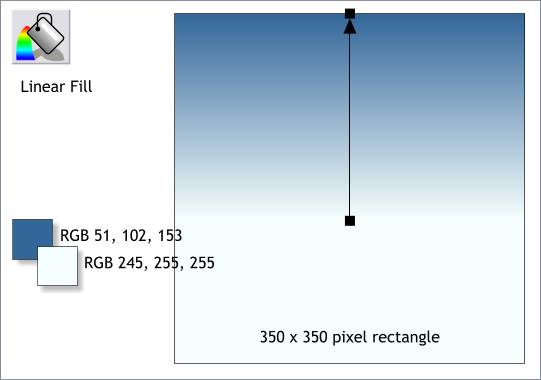
Step 1 Using the Rectangle Tool, and holding down the Ctrl key to constrain the rectangle to a square, click and drag a 350 pixel square. You can adjust the Height and Width settings on the Infobar to get the size just right. Select the square with the Fill Tool and then select Linear from the Fill Type drop down list on the top left of the Infobar. Drag the control handles (the black squares) of the fill path arrow until it is vertical, starting at the top of the square and ending about 2/3 of the way down. Open the Color Editor (Ctrl e) and select RGB Color Model from the Color Models drop down list. Click the top control handle and change the color using the RGB values shown above. Press the Tab key to cycle to the other control handle and change the ending color to the RGB values shown.
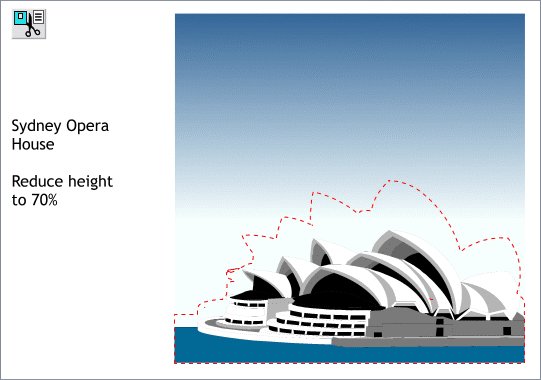
Step 2 Open the Clipart Gallery on the Infobar then open the Architectural folder and drag the Sydney Opera House image onto the page. Resize the image to the width of the square and with the image selected, drag the top center control handle (the black squares that surround the selected image) downward until the Scale Height percentage value on the Infobar is at 70%. NOTE: If you do not have any folders in your Clipart Gallery, follow the instructions for adding Fills except double click on Clipart folder and press Add.
Step 3 Enable Snap to Objects by clicking the red magnet icon on the Infobar or by right clicking on the page and selecting Snap to Objects from the pop up menu. Clone the square (Ctrl k) and reduce the size to 65% by changing either the Scale Height or Scale Width % setting to 65 and pressing Enter on your keyboard. Drag guidelines from the screen rulers (Ctrl L to display the rulers if the rulers are not displayed) and snap the guides to the four corners of each square. You can delete the blue square once you have snapped your guidelines to it. TIP: If you drag the Set View Quality slider (to the left of the red magnet icon) all the way to the left (Outline view) it will be easier to snap the guides to the corners.
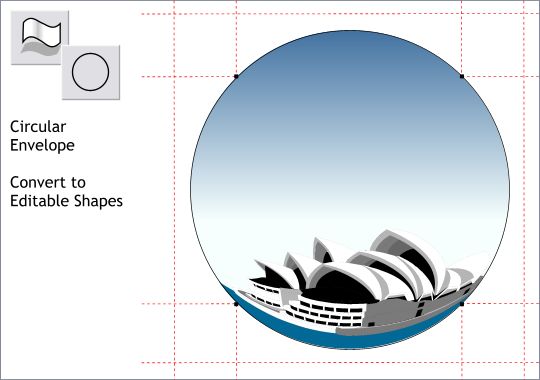
Step 4 Select the square and the opera house clip art, then select the Mould Tool. Click the Circular Envelope icon on the Infobar to apply a Circular Envelope. This creates a bit of a distortion but not enough for a fisheye lens effect. So... Convert the circular envelope to editable shapes (Arrange menu). This disables the circular envelope and lets us apply a new envelope.
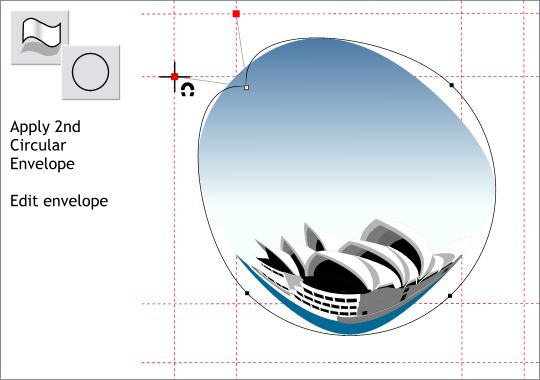
Step 5 Apply another Circular Envelope. Here is where the guidelines come into play. Click the top left control handle (the tiny square on the circle). Two gray lines with red control handles will appear. These are Bezier control handles. Drag the red control handles and snap them to the intersection of the two guidelines. When the red control handles are ready to snap to the guides, the cursor will display a magnet icon. (Continued on Page 5) |

|