|
|
|
|
|
||
 |
|||
Fourth of July Sparkler EffectOne of you fine readers, I regret to say I was unable to unearth the message, requested some time ago a tutorial on a holiday sparkler, one of those coated metal rods that when ignited sends sparks shooting in all directions. I'm not sure if I got this effect or not, like the ice tutorial, this was not one of my stock effects so I pretty much had to create it from scratch. Here is how.
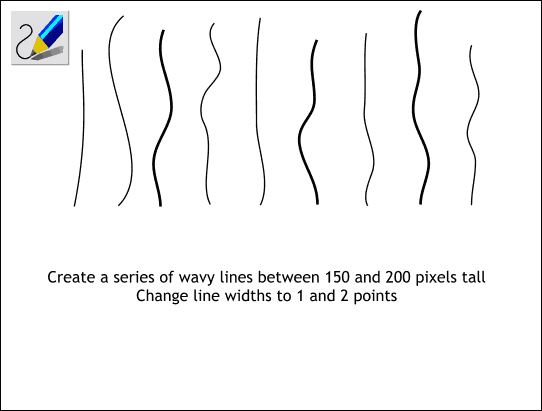
Step 1 Using the Freehand and Brush Tool, create a series of wavy lines about the same size as shown above. Make some of the lines 1 point in width and some 2 points in width.
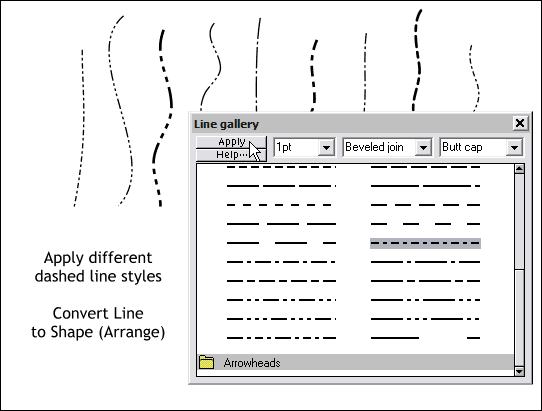
Step 2 Open the Line Gallery (the icon with the arrow on the right top area of the Infobar). Open the Dash Patterns folder and apply various line patterns to the lines as illustrated. After you have applied dashed patterns to the lines, select all the lines and from the Arrange menu, select Convert Line to Shape. All the lines are now shapes to which we can apply gradient fills.
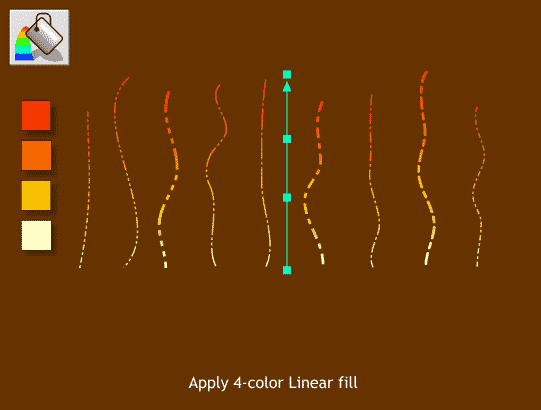
Step 3 Apply a 4-color Linear fill to the shapes starting on the bottom with pale yellow, to yellow orange, to orange, to red orange. (Select all the shapes, select the Fill Tool and select Linear from the drop down list of Fill Types on the Infobar. Drag the fill path arrow end points until the fill is up and down. Double click on the fill path arrow to add the additional color stations as shown above. Select a control point or color station and then click a color on the screen palette to add the color).
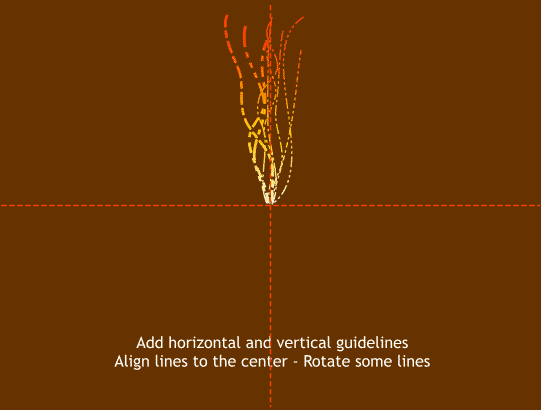
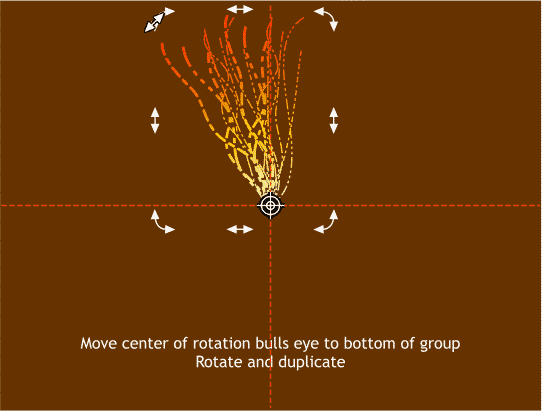
Step 4 Drag a horizontal and vertical guideline from the screen rulers through the center of the rectangle (Ctrl L to display the screen rulers). Bring all the dotted line shapes to the center and arrange them in a pattern, rotating some to create a V-shape. Select all the dotted line shapes and group them (Ctrl g).
Step 5 Click twice on the group to enable rotate/skew mode. Drag the rotation bulls eye to the intersection of the two guidelines. Drag one of the top corner arrows (the arced arrow handles) and rotate the group to the left so that the group overlaps the original group. Do not release the left mouse button. Click the right mouse button to drop a duplicate group.
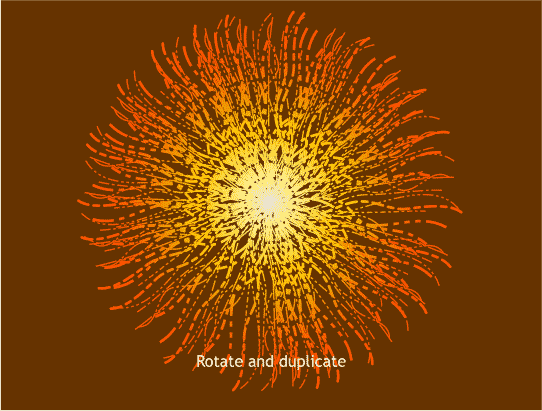
Step 6 Continue to rotate, duplicate the group until you have made a shape like the one above. You can continue and add more duplicates if necessary to fill up any open spaces.
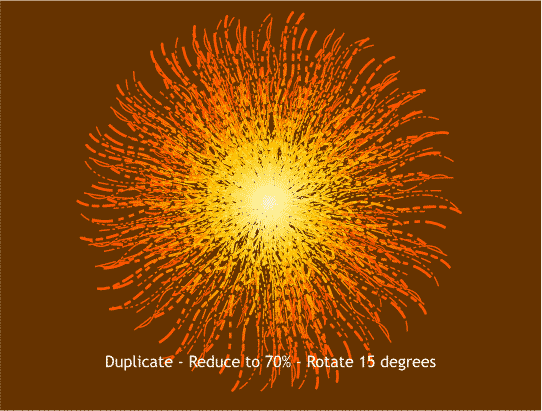
Step 7 Group all the groups. Clone the group (Ctrl k). On the Infobar in the Scale Width text entry box (just to the left of the lock icon) enter 70 and press Enter to apply the change. This fills in the center area. (If the group did not scale proportionately, enter 70 in the Scale Height text entry box and press Enter again). Click twice on the clone to enable rotate/skew mode and rotate the clone about 15 degrees (either direction is fine).
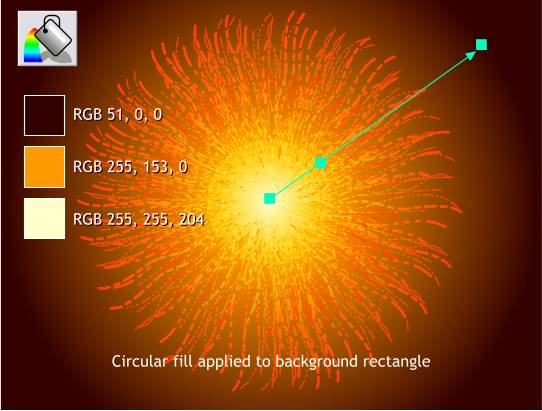
Step 8 Click the background rectangle with the Fill Tool to select it. Select Circular from the Fill Type drop down list. Drag the center of the fill to the center of the shapes. Add the colors to the fill as shown to add a diffused glow behind the sparks.
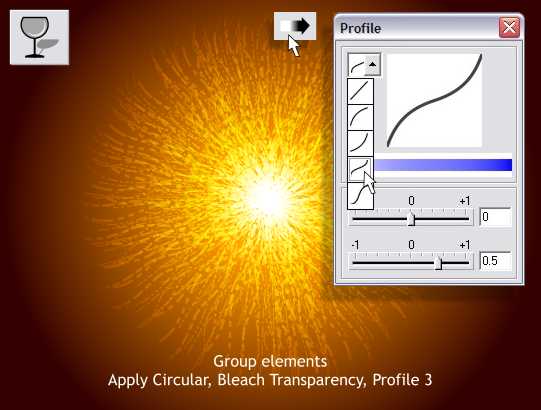
Step 9 Group all the elements except the background rectangle (Ctrl g). Apply a Circular, Bleach transparency. Click the Profile arrow icon on the Infobar. From the Preset Profile drop down list, select Profile 3.
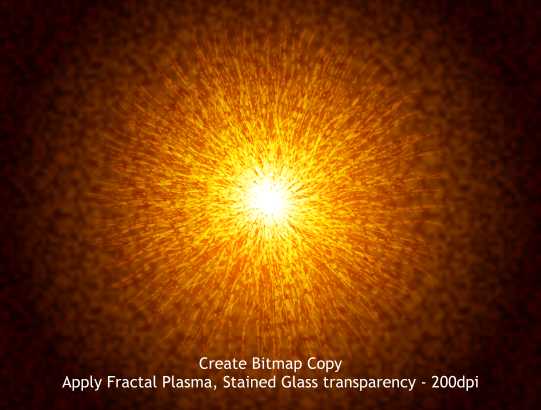
Step 10 Here is the last step and one which makes the sparkler effect come to life. Create a Bitmap Copy of the rectangle and grouped elements (Arrange menu). Select the TrueColor option in the Create Bitmap Options dialog box. Apply a Fractal Plasma, Stained Glass transparency. Right click on the bitmap. On the Infobar you will see a text entry box with a number followed by dpi (dots per inch). Change this amount to 200dpi and press Enter to apply the change. Now that kind of looks like a sparkler shooting sparks off in every direction, don't you think? |
|