 |
 |
| H 1 2 3 4 5 6 |
|
|
|
Candles and candle flames are ephemeral to say the least. I worked with this image quite a bit until I felt I had something that would be an acceptable representation of a wax candle and soft glowing flame.
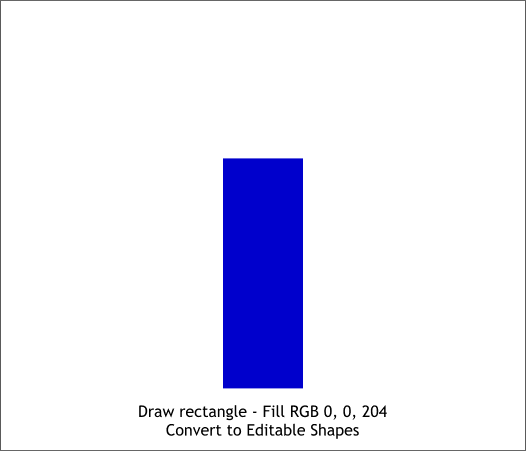
Start with a blue rectangle. The size is not important and you can make yours taller.
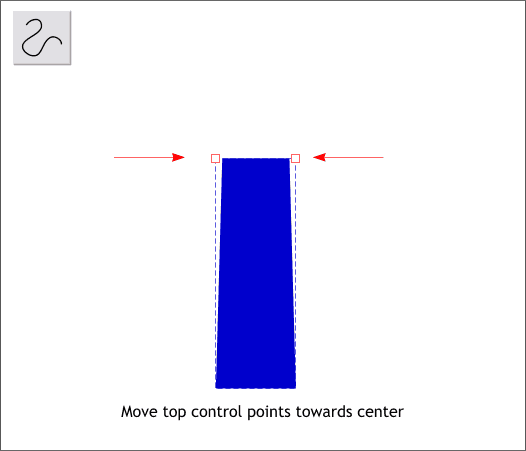
Most candles taper. Convert the rectangle to editable shapes (Arrange > Convert to Editable Shapes). With the rectangle still selected, select the Shape Editor Tool , select on of the top control points and move the control point towards the center a short distance. Now move the opposite control point the same distance.
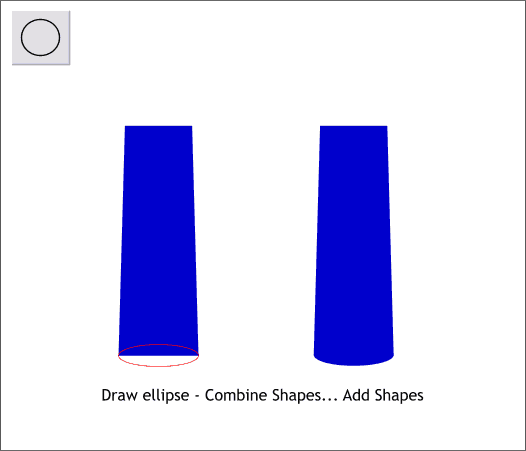
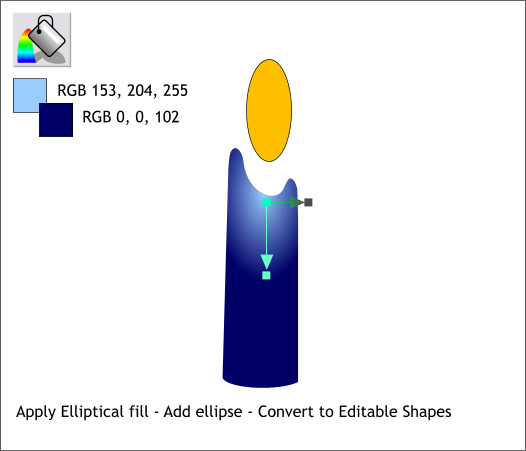
Add an ellipse the width of the bottom. Center the ellipse over the bottom of the rectangle so the center of the ellipse is aligned with the bottom side of the rectangle. Send the ellipse to the back (Ctrl b ). (I've made my ellipse transparent so you can see how it aligns over the bottom of the tapered rectangle). Select both the ellipse and the tapered rectangle from the Arrange menu, select Combine Shapes... Add Shapes. The two objects become one and the combined object takes on the properties of the top object.
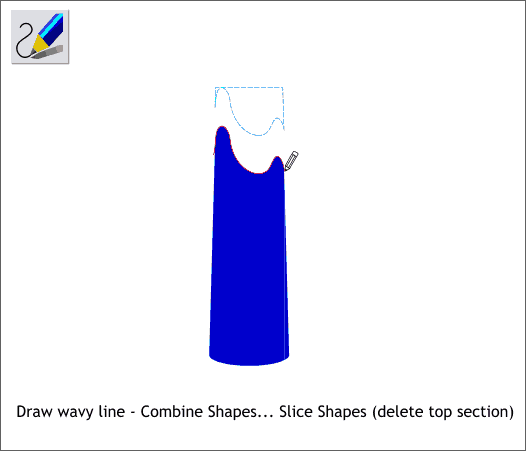
Select the Freehand and Brush Tool. Draw a wavy line that starts just outside the blue shape and ends just a little beyond the blue shape. Select the line and the blue shape and Arrange > Combine Shapes... Slice Shapes. Using the Selector Tool, select the top shape and delete it.
Draw a flame sized ellipse. Select the blue shape with the Fill Tool. From the drop down list of Fill Types on the Infobar, select Elliptical. Drag the center of the fill to the top portion of the candle and adjust the fill path arrows as shown. Modify the two colors using the RGB values shown. The wax of burning candles have a soft glow at the very top.
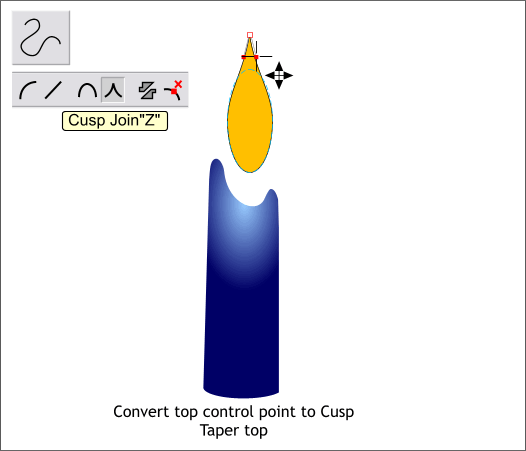
Select the ellipse and from the Arrange menu, select Convert to Editable Shapes. With the ellipse selected, select the Shape Editor Tool and click on the top control point. Move the control point up a little bit. On the Infobar, click the upside down V shaped icon to change the join to Cusp. Drag the two red control handles down until the top of the flame is pointed. TIP: With the Shape Editor Tool and a control point selected, you can press s or z on your keyboard to change the join to Smooth or Cusp joins.
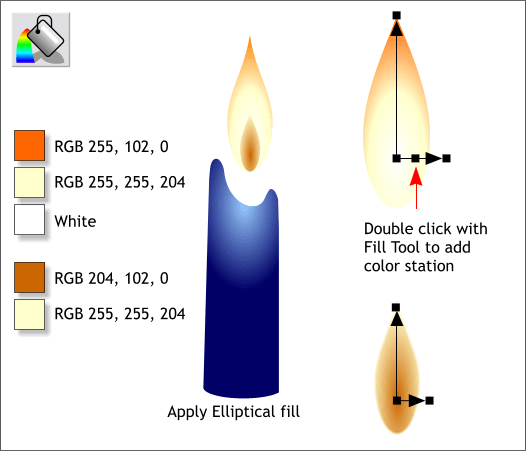
Candle flames have two distinct areas. The area closest to the wick is mostly transparent while the top portion of the flame is blindingly bright and opaque. Select the tapered ellipse with the Fill Tool. From the drop down list of Fill Types, select Elliptical (a fill unique to Xara). Drag the center of the fill to the lower 1/3 of the tapered ellipse, adjust the fill path arrows as shown, and apply the orange and white colors. Double click on the lower fill path arrow with the Fill Tool to add an additional color station. Apply a pale yellow fill. Duplicate the tapered ellipse and make it about 1/2 the size. Change the fill colors to the burnt orange and pale yellow shown above, lower left. Right click on the color station on the fill path arrow to remove it.
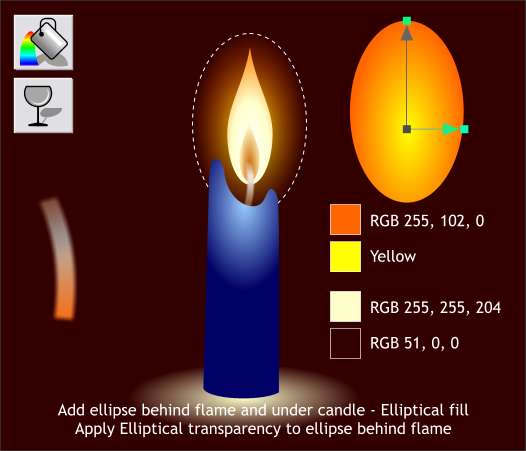
Add a dark brown (RGB 51, 0, 0) rectangle behind the candle. Create an ellipse that is larger than the flame and apply an Elliptical fill using the yellow and orange colors shown. Center the ellipse over the flame and then press Shift Ctrl b until the ellipse is between the flame and the background. Select the Transparency Tool and then select Elliptical from the Transparency Shape drop down list. This adds a diffused and softening effect to the flame. Add another ellipse and the bottom of the candle and apply a two color Elliptical fill using the two colors shown on the bottom to add a glow of candle light on the surface. I made the wick by first creating a curved line with the Shape Editor Tool, increasing the line Width to 2 points, converting the Line to Shape (Arrange menu) and then applying a two color Circular fill using 40% Black and Orange.
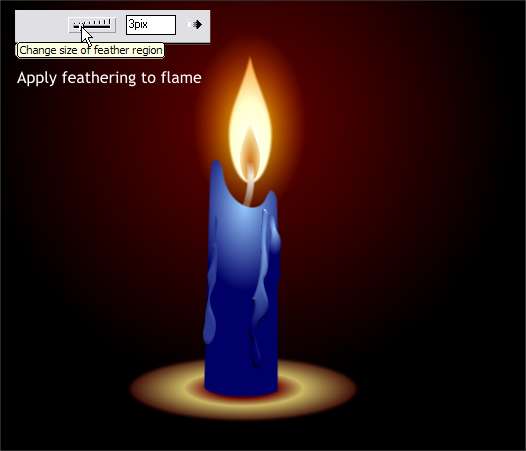
(I modified the ellipse under the candle adding the background color in the center, then a pale gold and then the background color again to make this light a little more realistic). Select the two flame elements and apply around 3 pixels of feathering using the Change Size of Feather Region slider on the top right portion of the Infobar. Feathering softens the edges of the flame and increases the diffused light effect. You can also add a small amount of feathering to the candle itself to soften the edges. The dripping candle wax was achieved by creating drip shapes with the Freehand and Brush Tool, applying a similar fill as the candle, and then adding a Rounded Bevel to the shapes. The Light Elevation setting (in the Slider Type drop down list) for the bevels was reduced to around 30.
|
|
|
|
|
|
|