 |
 |
| H 1 2 3 4 5 6 |
|
|
|
In this tutorial, we'll create a simple label and then create a cylindrical can and using Xara's Mould Tool mould the label to the shape of the cylinder. Using the Rectangle Tool, create two rectangles to the sizes noted above. Add some design elements such as those shown above. The peas are just circles with a Circular fill applied with the center of the fill moved up and left some. When you have finished your label elements and type, select all the elements and group them (Ctrl g or Arrange > Group).
Create two ellipses using the Ellipse Tool to the sizes shown above confirming the size on the Infobar on the top of the screen. Place them so that the centers of the two ellipses are approximately 300 pixels apart. Make sure the top ellipse is in front (Ctrl f). Select the Blend Tool, click and drag from the bottom ellipse to the top ellipse. On the Infobar, change the number of Blend Steps to 7 and press Enter to apply the change. With the blend selected, select Arrange > Convert to Editable Shapes (which disables the blend and no further blend changes can be made). Then from the Arrange menu, select Ungroup.
Delete the ellipses shown above in the blue dashed outlines.
Using the Rectangle Tool, create a rectangle 240 pixels wide by 295 pixels tall so that the top and bottom of the rectangle passes through the center of the top and bottom ellipse as shown. Select the rectangle and the bottom ellipse and Arrange > Combine Shapes... Add Shapes which creates a shape with one continuous outline (shown in pale yellow).
Apply the fill color of the combined shape using the same color you used to fill the larger rectangle in the label. Fill the top ellipse pale blue and bring it to the front (Ctrl f ). Fill the two ellipses in the center white so that you can see them and drag guidelines from the screen rulers (Ctrl L to display rulers) through the centers of the two white ellipses and to the width of the combined rectangle. Resize the label to fit between the guidelines as shown.
Select the grouped label elements with the Mould Tool. On the Mould Tool Infobar, press the Default Envelope icon. Click a corner of the envelope to enable the control handles (the solid red boxes at the end of the thin gray lines). This will take some trial and error, but arrange all four control handles as shown above fine tuning as you go along until the label matches the edges of the two white ellipses. To avoid tilting the text, all control handles should be approximately in the same position. (You won't be able to see the bottom white ellipse as it is hidden behind the label). When your label matches the edges of the two white ellipses, you can delete the two white ellipses.
Duplicate the combined rectangle and ellipse and apply a Linear fill using the four shades of black noted above. To Apply a Linear fill, select the duplicate shape with the Fill Tool, select Linear from the Fill Type drop down list on the Infobar, and drag either end of the fill path arrow so the path is horizontal. To add additional colors, double click on the fill path arrow with the Fill Tool.
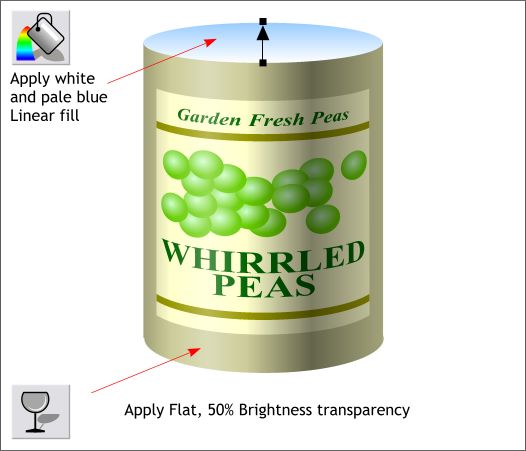
Center the Linear-filled shape over the front of the can and apply a Flat, Brightness transparency (Select Brightness from the Transparency Type drop down list). Move the Transparency slider setting to 50%. This adds a little shading to the can and makes it look round. Apply a white and pale blue Linear fill to the top ellipse.
Select the top ellipse and apply a Round Frame, Inner Bevel using the Bevel Tool. (I am thrilled that I finally found a use for this bevel shape!) Recreate the bottom ellipse, apply the same Linear fill and apply the same bevel but with the Outer Bevel option. The final image looks very basic and like bad clip art. But with some additional work, and using the same techniques, you can create a much more refined image.
|
|
|
|
|
|
|