 |
 |
| H 1 2 3 4 5 6 |
|
|
|
In this final tutorial, we'll create a rope Brush Shape and apply it to a script letter created with the Freehand and Brush Tool.
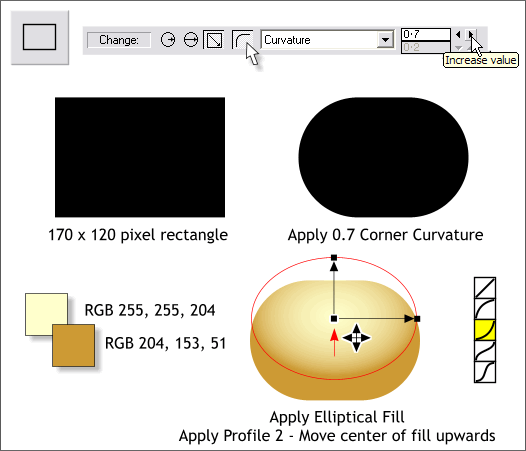
Create a 170 x 120 pixel rectangle. Apply a 0.7 Corner Curvature. Try to draw the rectangle as close to the actual size as possible. If you resize the rectangle a lot before you apply corner roundness, the corner will not be even.
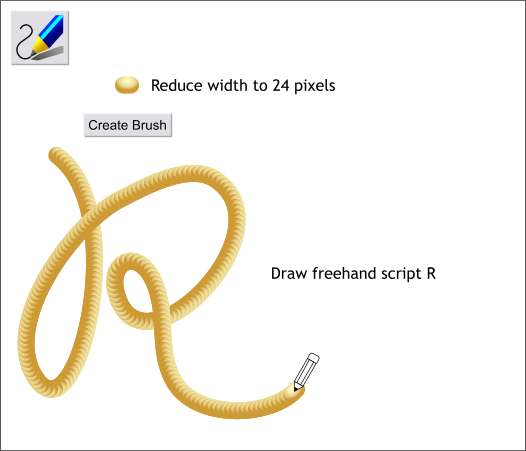
Reduce the rounded rectangle to about 24 pixels. With the rectangle selected, select the Freehand and Brush Tool, then press Create Brush. Name your brush Rope and press OK . Draw a freehand letter shape with the Freehand and Brush Tool, such as the script R shown above. If your first attempt is not so good, delete it and try again and keep trying until you are happy with the results. Xara will automatically apply the brush you just created. (You can also edit the path with the Shape Editor Tool and the brush will reapply).
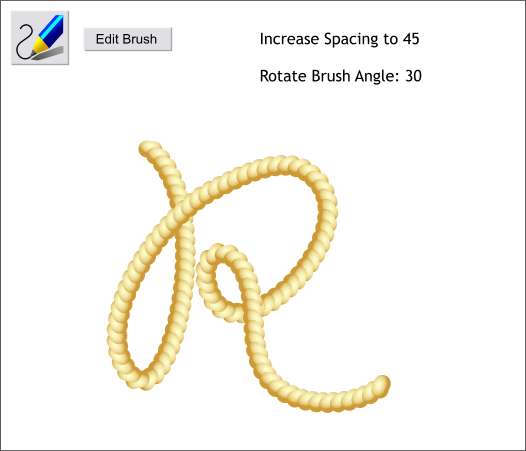
With the line and the Freehand and Brush Tool still selected, click the Edit Brush button on the Infobar. In the Spacing tabbed section, adjust the slider to about 45 or until the rope looks more like the example above. In the Rotation tabbed section, change the Rotate Brush Angle setting to 30. Close the Edit Brush dialog.
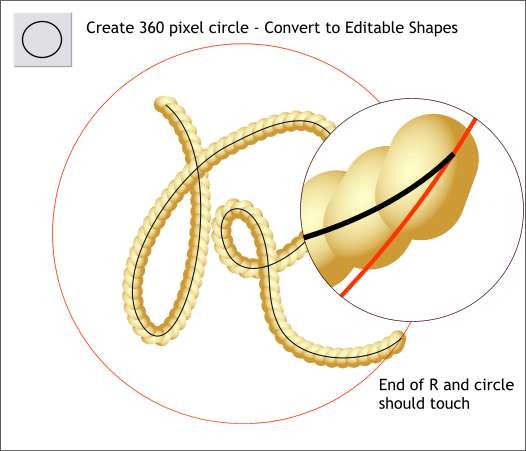
Using the Ellipse Tool, and holding down the Ctrl key to constrain the ellipse to a circle, create a 360 pixel circle and align it with the R so that the end of the R touches the circle. TIP: Make a duplicate of the R, select the line option in the Select an Existing Brush drop down list and changed the line Width back to .5.
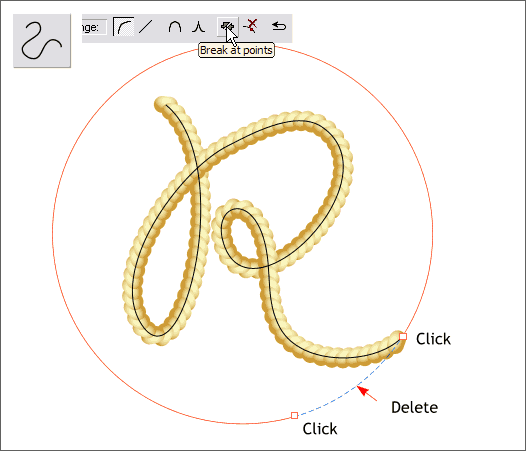
Convert the circle to Editable Shapes (Arrange menu). With the circle selected, select the Shape Editor Tool. Click on the circle at the point the end of the R touches it and press the Break at Points icon on the Shape Editor Tool Infobar. Now click on the circle to the left as indicated above (click) and again Break at Points. Select the portion of line (shown in blue dashed outline) and delete it. Break at Points does just that. It breaks the line at the place where you added the control point by clicking on the line.
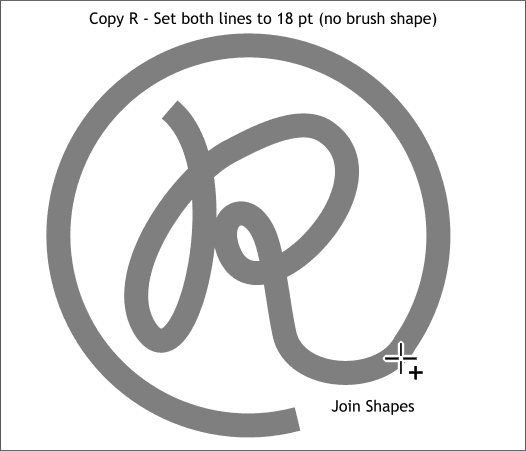
Call it a feature (we'd never call it a bug), but in order to get the rope to turn out the way we want it to, we need to do this next step. Copy the Rope R to the clipboard (Ctrl c). Select the rope R with the Freehand and Brush Tool and change the Brush to no brush by selecting the first option (the straight line) in the Select an Existing Brush drop down list. Change the Width for both the R and the former circle to 18pt. Select both objects and Arrange > Join Shapes. With the joined shape selected, select the Shape Editor Tool. Click in the place were the circle and the R were joined and drag the point to the side a little bit. (You will notice that even though the two paths were joined, in fact they are not really joined). Now drag the same control point back to the other end point. The cursor will change to reveal a + indicating that now the two lines will be actually joined into one path. A bit laborious I admit, but necessary I'm afraid.
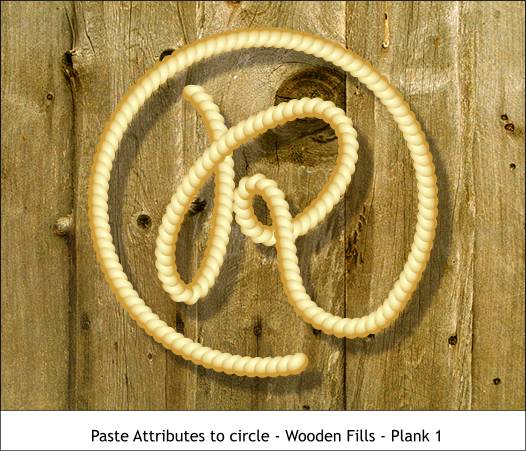
Select the joined circle R shape with the Selector Tool (the arrow pointer). From the Edit menu, select Paste Attributes (or Shift Ctrl a). Providing you have not copied anything else to the clipboard since copying the rope R, pasting attributes will apply the rope brush to the combined circle R as shown above and the highlights on the R will face upwards as they are supposed to. I added a Wall Shadow with the Shadow Tool to the rope circle R and dropped in a Plank 1 image fill from the Fill Gallery, Wooden Fills folder for authenticity. And so, as the sun slowly sets in the west, we come to the end of another workbook. Your comments and questions are always welcome. Please use the feedback form on the next page to send me your comments. Gary W. Priester
|
|
|
|
|
|
|