|
 |
| H 1 2 3 4 5 6 |
|
|
|
In this next mini-tutorial, we'll create a brass plaque with stars punched out in the center. You will need the star from the last tutorial, or you can recreate it for practice.
Using the Rectangle Tool, draw a rectangle that is approximately the size shown above. Add a star about 285 pixels wide and a smaller star about 30 pixels wide. Convert the star to editable shapes (Arrange > Convert to Editable Shapes). Set the fill to none by left clicking the cross hatched box to the left of the screen palette. I have made the outline red for clarity only. TIP: You can drag an approximate rectangle, then enter the width and height in the appropriate text entry boxes on the Infobar and then press Enter to create a rectangle to the exact size. If your units are not set to Pixels, key in your number as 400pix and 320pix (no spaces) and press Enter.
Enable Snap to Objects by pressing the red magnet icon on the Infobar so it is in the down position. (Or right click on the page and select this option). Using the drag and right mouse click to drop a duplicate, drag and drop duplicate stars on all ten points. If you drag the center of the star over the points, they should snap onto the points.
Select the Blend Tool. Click on the top star and drag down to the next star on the left. Change the number of Blend Steps on the Infobar from 5 to 1 and press Enter to apply the change. Drag on the second star to the third star and continue working your way around and creating blends until you reach the last point before the top point. (You cannot drag onto the starting star).
Select the blend and Arrange > Convert to Editable Shapes. With the stars still selected, select Arrange > Ungroup (or Ctrl u). Duplicate one of the stars and place it as indicated above. NOTE: Blends are "live" effects, and can be edited and modified at any time until you Convert the Blend to Editable Shapes.
Delete the red outline star (or move it to one side as we will need it later on). Select all the small stars and Arrange > Join Shapes. Hold down the Shift key and click on the stars and then the rectangle. Arrange > Join Shapes.
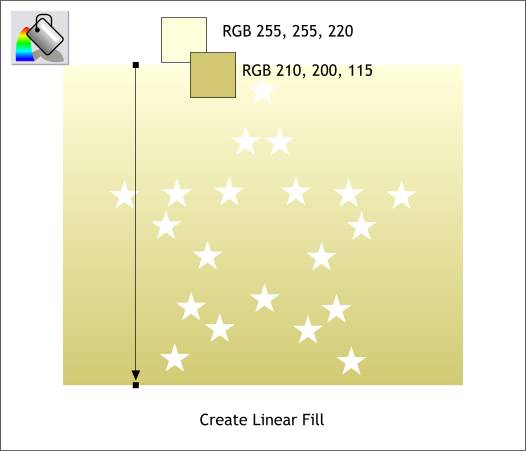
Apply a Linear fill using the two colors shown above (select the Fill Tool then select Linear from the drop down list of Fill Types on the Infobar). Drag the ends of the fill path arrow so they are vertical as shown. (Use the Ctrl key). To apply the two colors, open the Color Editor (Ctrl e). Click on the top square on the fill path arrow. Select RGB Color Model from the drop down list of Color Models in the Color Editor , and enter the three numbers shown on top. Select the opposite black square and enter the second set of numbers, one number in each text entry box).
Click on the shape with the Bevel Tool to select the shape. Select Flat from the Bevel Type drop down list, then press the infacing arrow icon to change the bevel to Inner. Select Size from the Slider Type drop down list and change the size to 2pix. Press Enter to apply the change.
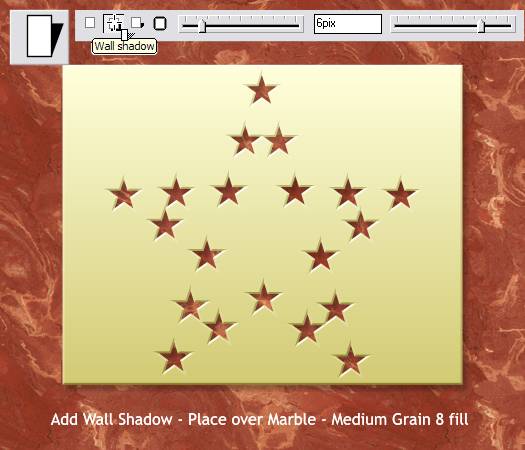
Add a rectangle behind the shape and apply a fill of your choice. I have used a red marble fill form the Marble Fills folder in the Fill Gallery. Select the beveled shape with the Shadow Tool and click the Wall Shadow icon to apply a Wall Shadow. An All Star Plaque!
|
|
|
|
|
|
|
|