 |
 |
| H 1 2 3 4 5 6 |
|
|
|
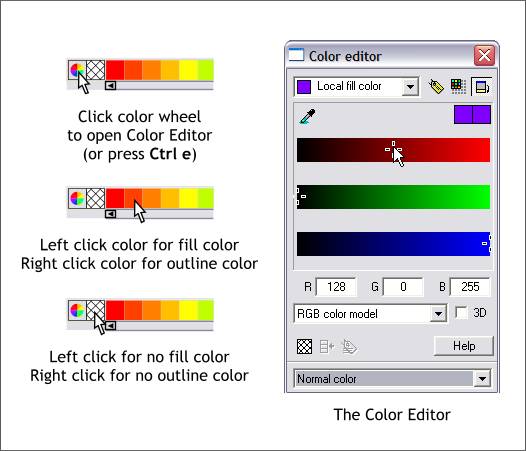
To edit colors in Xara, you use the Color Editor (makes sense). If you are familiar with editing colors in other applications, the Color Editor will be easy enough to use. If you are new I'll explain the process.
To open the Color Editor press Ctrl e or click the small color wheel icon just to the left of screen palette at the bottom of the screen. To apply a solid fill or outline color, left click on any color on the screen palette (called the Color Line) with the left mouse button. Right click on any color on the color line to apply an outline color. To set a fill to none, left click on the cross hatched box between the color palette and the color wheel icon. To set the outline color to none, right click on the cross hatched box.
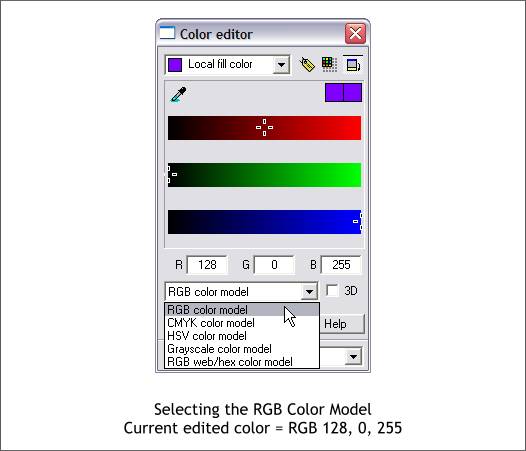
The Color Editor has 5 Color Models shown above in the drop down list. Most Xara tutorials use the RGB Color Model. The 3 text entry boxes above the Color Model drop down list change to match the selected color model. In the illustration above they reflect the RGB Color Model. The color shown is made up of Red (R) 128, Green (G) 0, and Blue (B) 255. To edit colors, you may either key in the 3 RGB values, or mix the colors dragging the sliders to modify each color. The two purple squares in the upper right area of the Color Editor represent the Original Color [starting color] (left) and Current [edited] Color (right).
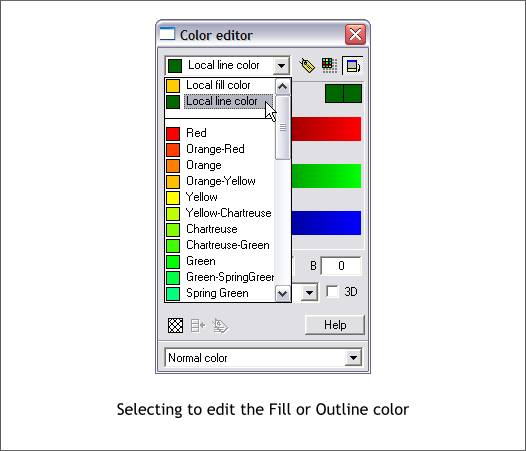
The drop down box at the top of the Color Editor allow you to either the Local Fill Color or the Local Line Color. These can be confusing as both essentially look alike. So if you are editing the Local Fill Color and nothing is happening, make sure you have select the correct Local Color.
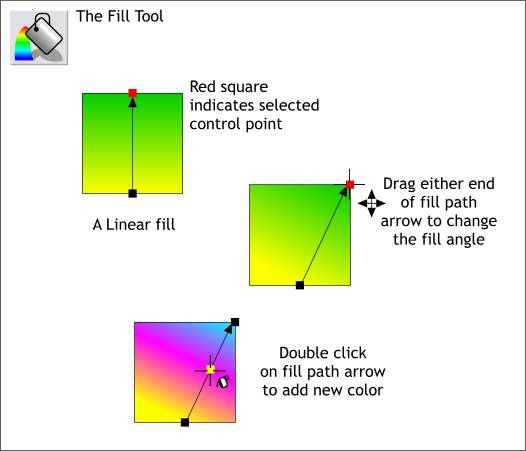
Most gradient fills can be edited in the same way. Linear gradient fills can be edited by clicking the control point (the small square at either end of the fill path arrow) and then modifying the Local Fill Color in the Color Editor or selecting a color from the screen palette. Fills can be selected in the Fill Type drop down list, which is enabled on the Infobar when an object and the Fill Tool are selected. The fill path arrow determines the direction that the fill goes. The length and direction can be modified by dragging the ends of the fill path arrow with the Fill Tool. (The Transparency Tool works the same way). To add additional colors to the gradient fill, double click on the the fill path arrow with the Fill Tool. These additional colors can be moved to a new location on the fill path arrow by dragging the color control point or by using the arrow keys. Additional colors can be added to Linear, Circular, Elliptical and Diamond fills. When you work with Elliptical and Diamond gradient fills, which have two fill path arrows, click on the horizontal fill path arrow to add a new color. You can also drag and drop colors from the screen palette onto an object to create a Flat fill. If you drop colors onto a gradient-filled shape, colors will affect the control point closet to where the color is dropped. With Xara X, users can also drop colors directly onto the fill path arrow.
|
|
|
|
|
|
|