 |
 |
| H 1 2 3 4 5 6 |
|
|
|
In this final section, I'll attempt to explain Xara's GIF and 8-bit PNG export options.
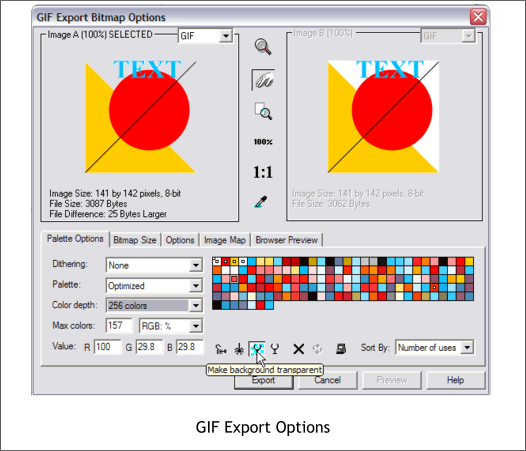
When you export your image as a GIF (a GIF file can contain no more than 256 colors) or an 8-bit PNG (also 256 colors maximum) bitmap image, the first thing you see after you name your image and select a file type is the GIF or PNG Export Options dialog (the two are virtually the same). By default, Xara selects the Make Background Transparent option with a Color Depth of 256 colors. If fewer colors are needed, this will be reflected in the Max Colors box, in this case 157. If the image has a transparent background, the transparent area is shown against gray as shown above left. If the image has a non-transparent background, the background color will appear, as shown on the right with the white background behind the circle and text. The small wineglass icon on the bottom with the blue check background turns the transparent background option on and off. In the down position, background transparency is enabled.
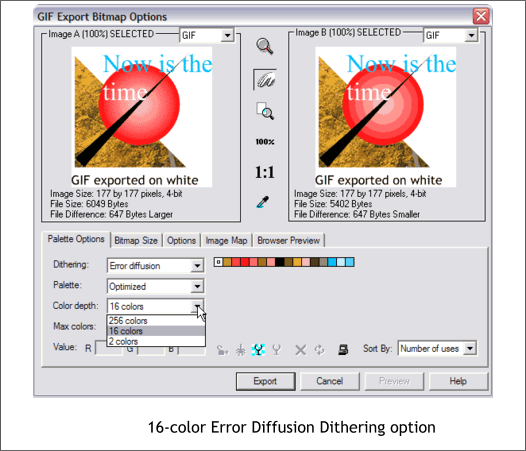
You have three Color Depth options, 256, 16, and 2 colors. Many times, you can use the 16 Colors option with the Error Diffusion Dithering option to create a much smaller file size. The two images above show the same image in 16 Colors with Error Diffusion dithering and without. The default setting is None.
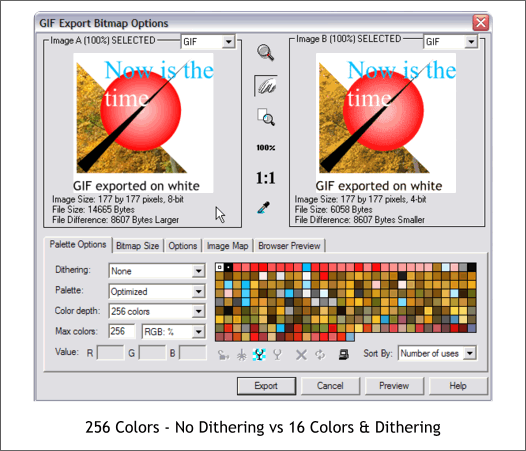
The two preview images shown above show 256 colors on the left with no dithering and 16 colors with Error Diffusion dithering on the right. The two previews look essentially the same. The difference is file size. The image on the left is more than twice the size as the image on the right. Side-by-side Preview: There are two preview windows in the Bitmap Export Options dialog in case you want to experiment with different settings. Just click in the right preview window to enable it and use whatever options you want to try. The information at the bottom of the window will show the difference in file sizes and the preview will let you see the visual difference.
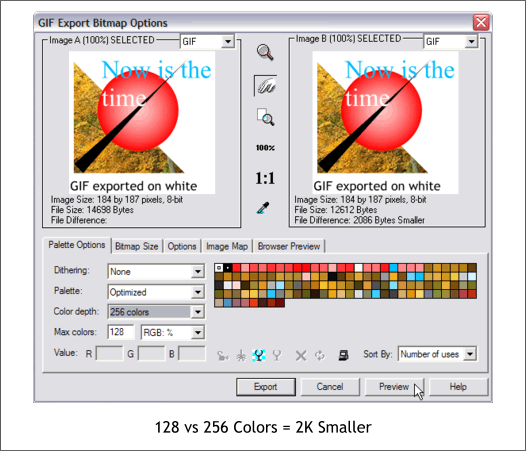
Sometimes you need more than 16 colors but you do not need the entire 256 colors. You can manually change the Max Colors amount and press Preview to see the difference (if any). The example on the right uses half the number of colors (128) and produces virtually the same image with a savings of 2K in file size.
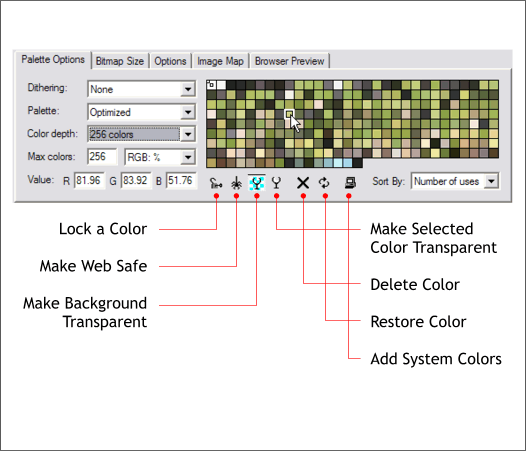
There are icons along the bottom of the dialog that provide more options. These icons are normally grayed out. But if you select any of the colors in the colors palette, the options become enabled. Lock a Color prevents a color from being deleted. When the Sort By: Number of Uses is selected (default) colors are displayed in descending order from most used (top left) to least used (bottom right). You can press the Delete Color X to delete colors and press Preview to see how the image is effected. Often you can get by with many fewer colors. Lock a Color (or colors), prevents the color or colors from accidentally being deleted. Make Web Safe changes a color to it's closest web safe color. With today's color displays, this feature is not really necessary. To the right of the wineglass with the blue checked transparent background is the Make Selected Color Transparent. You can use this option to make any other of the colors transparent. You can make as many colors as you want transparent but the only time you might use this option would be to make a large area of a solid color transparent. Making individual pixels transparent is a lesson in futility. Delete Color deletes a color from the palette. When you delete a color, the Restore Color icon is enabled permitting you to undo the deletion. Finally Add System Colors adds the Windows System Colors to the palette. Again, with today's dispalys, I think this feature is unnecessary.
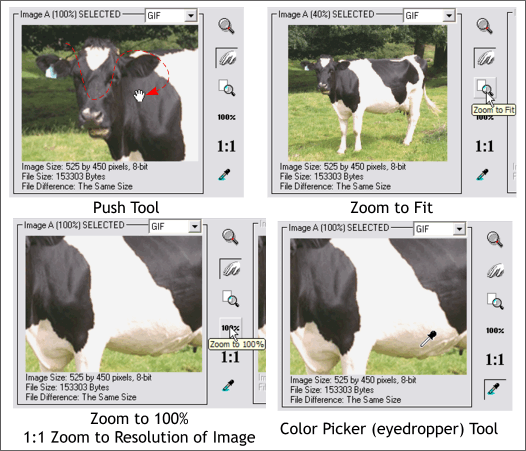
Between the two Preview windows are a group of viewing tools. The Zoom Tool lets you zoom in closer to your preview image. The Push Tool moves the image around in the Preview window. Zoom to Fit fits the entire image into the Preview window. As near as I can tell, 100% and 1:1 both display the preview image at 100% or 1 pixel in the image is the same size as a pixel on your monitor. The Color Picker lets you sample individual colors from the image. There is more, but all I wanted to do today was to cover the basics and I think we have done that. Has this Workbook helpful? Questions, comments, or suggestions? Please use the feedback form on the next page to send me your thoughts. Gary W. Priester
|
|
|
|
|
|
|