 |
 |
| H 1 2 3 4 5 6 Download Zipped Tutorial |
|
|
|
I'm not sure what to call this next tutorial, so I'm going to call it a shiny triangular thing and leave it at that. It can be whatever you want it to be.
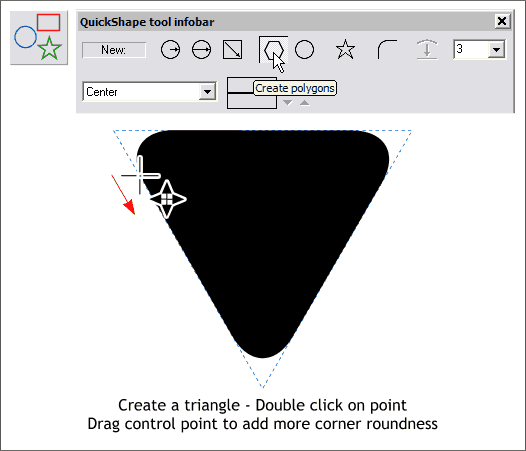
NOTE: In this Workbook, I have dragged the Infobar onto the screen and resized it to fit it on the page. When you do this, each time a new tool is selected, the title bar changes to identify the new tool, in this case, the QuickShape Infobar. Select the QuickShape Tool. Set the Number of Sides to 3 and click the Create Polygons icon but make sure the Starred Shapes icon is not selected. Hold down the Ctrl key and drag an equilateral triangle and as you drag rotate the triangle so it points down. Double click on any of the three end points to change the endings to Curved Corners. Drag one of the control points, that is not a corner control point, a little to round the corners a little more.
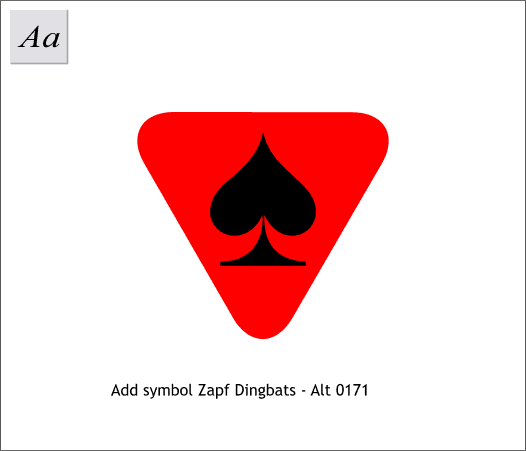
Click the Text Tool on the screen. From the drop down list of Fonts on the Infobar, select Zapf Dingbats. With Num Lock enabled on your keyboard, hold down the Alt key and on the numeric keypad key in 0171 (then release the Alt key). This will produce the spade symbol shown above. (You don't have to use the spade, you can use any symbol or create one of your own if you like). Visually center the symbol over the triangle.
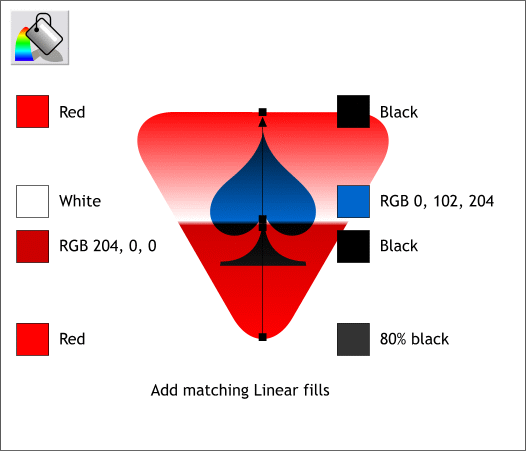
Using the Fill Tool, apply a Linear fill to the triangle and to the symbol. Start and end each Linear fill in the same place. Double click on the fill path arrow with the Fill Tool to add two additional color control points and move these center two color control points close together, but leave 2 or 3 pixels between them so the line created is not razor sharp. Apply the colors shown to each of the fills. If you need help editing colors in the Color Editor (Ctrl e) visit Workbook 20 Xara Basics - Editing Colors.
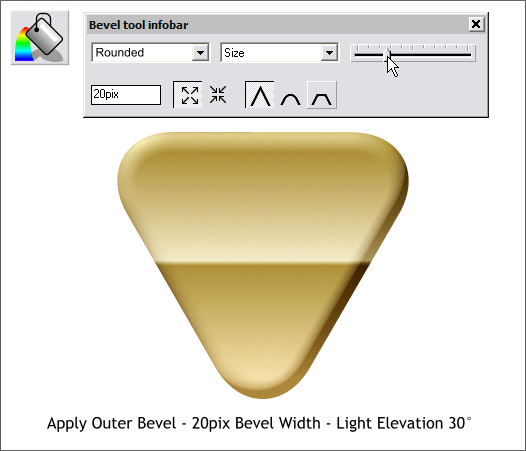
Clone the triangle (Ctrl k). Change the fill colors to the gold tones shown above.
Select the gold colored triangle with the Bevel Tool. Drag away from the triangle a small distance to apply an Outer Bevel. From the Bevel Type drop down list, select Rounded. Select Size from the Slider Type drop down list and move the Size slider to 20pix. From the Slider Type down list, select Light Elevation and change the setting to 30 degrees.
Send the beveled shape to the back (Ctrl b). Select the red triangle and apply an Inner Bevel, 4pix Bevel Width and set the Contrast to 80%. From the Slider Type drop down list, select Light Angle and change the angle to 45 degrees. Anyone who has a name for this is welcome to send it to me.
|
|
|
|