|
 |
| H 1 2 3 4 5 6 Download Zipped Tutorial |
|
|
|
One of the big changes in X1 is support for CMYK TIFF export. This is a welcome feature for those who need to create a CMYK TIFF file for commercial printing. The Show Print Colors option has been overhauled and expanded to make this option closer to Adobe Illustrator's simulated CMYK color space.
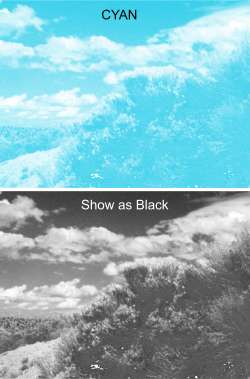
Simulate Print Colors modifies the colors to simulate CMYK color space. Show Cyan, Magenta, Yellow, and Black displays a simulation of each of the selected process color (CMYK) as would be seen in a printer's 4-color printing plates. When you select one of the four options, Show Cyan (C), for example, Xara changes the screen display to show only the amount of the image that will be printed in Cyan. If there is no Cyan in the image, the screen will be blank. This lets you see how much of the selected image will be made up of Cyan. The image is "color separated" into each the four colors, CMYK.
The example above shows the four colors separated out of the full color image in the center. Each of the four colors will be screened into a pattern of solid color dots of varying size based upon the lightness or darkness of the area. When all four colors are printed with transparent inks, the result is a full color image. NOTE: In theory, you can print a color picture with just the three primary colors, Cyan, Magenta and Yellow. But in reality you need to add black to give the colors depth and detail. That is why we have the four "process" colors CMYK.
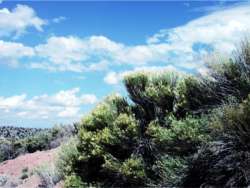
The two images shown above illustrate the difference between Screen Colors and Show Print Colors. Screen Colors are RGB colors and are brighter than printed colors. The reason for this is the color gamut of RGB colors, also known as color space, is far greater than the color gamut (or dynamic range) of printed colors. Certain colors are more muted when printed. A good example is sky blue. In the RGB version, the colors are bright and saturated. But in the CMYK version, much of the brightness and color saturation is lost. So, when preparing images to be exported as CMYK TIFF files, previewing at the image in Simulate Print Colors can be invaluable in predicting the final printed image. NOTE: When exporting an image as a CMYK TIFF, export in the Screen Color mode. Xara will do the rest.
The option at the bottom of the menu, Show Color as Black shows the selected CMYK color as it will appear on the printing film. All CMYK colors are separated in black and white. The black image on the bottom shows that there is a large amount of cyan in this image. In order to display color as black, a CMYK color must first be selected, so this is a 2-step process.
Just for fun, I viewed the image shown in the screen colors example in the middle of this article, in each of the four color modes. And in each color mode, I made a Bitmap Copy (Arrange > Make Bitmap Copy... ). When I had made four separate color images, I reset the display to screen colors and centered all four images (the cyan, yellow, magenta and black versions) and applied a Flat, Stained Glass, 0% transparency to all images resulting in the image above. This is kind of the idea behind 4 color printing. Finally, in reference to the manually modified image of my friend Barry offering the bottle of wine to the painted lady, I mentioned a trick to get the improved image. What I did was make a black version of the image using the Window > Show Print Colors > Black, center the black image over the photo, and add a Flat Stained Glass transparency, 80%. The small amount of added black gave the image more depth and definition. For more information on Commercial 4-color Printing and Imagesetting see the Xara Xone WebXealot 26 One of the more frequent questions and/or requests is how to get transparent layers from Xara into Photoshop. Xara X1 answers this question brilliantly.
The image above is contained on three layers, each layer named to represent its contents. The sphere and its highlight have transparency and permit some of the background layer to show through. The worm is floating in space on a layer of its own.
All three layers were selected and exported as a PNG file. The True Color + Alpha option was selected in the Palette Options section. In the Options tabbed section, Transparent and Export each layer as a file of its own were checked. The file was exported. Xara creates a file for each layer using the name of the layer for the file name.
In Photoshop CS, all three files were Opened. The sphere was copied and pasted onto the Background image and a glow applied. The Worm was copied and pasted and a drop shadow added. The background image and the two floating objects now exist in Photoshop on three separate layers. While this can be done in Xara X, you need to export each layer separately which involves making the other layers invisible. And if your image has a dozen or so layers, this can take some time. Having the ability to batch process all the layers at one time is great. This concludes the first preview of Xara X1. In Workbook 26 I'll continue to review more of the new features and improvements. Xara X1 is being offered for only $29.00 (until June 12, 2004) to all registered owners of Xara X. Click here to order your copy of Xara X1 today. Questions, comments, suggestions are encouraged. Please use the feedback form on the next page to send me your comments. Gary W. Priester
|
|
|
|
 In addition there are new options in the Show Print Colors fly out (found in the Window menu) shown on
the left.
In addition there are new options in the Show Print Colors fly out (found in the Window menu) shown on
the left.