|
|


|
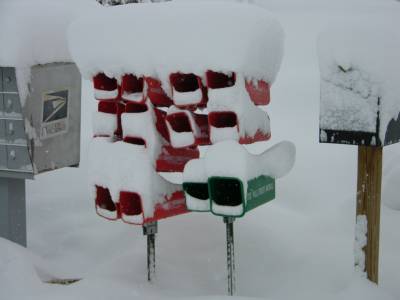
Xtreme Pro has added a Levels control, a valuable image editing feature to the Xara Picture Editor. This feature found in many image editing programs, like Photoshop, lets you redistribute the amount of light and dark and middle values in an image. If you need a more detailed explanation of how the Levels adjustments work, press F1 when you are in the Levels dialog (or any dialog for that matter) for a complete feature overview. For this tutorial, we'll use the Levels control to correct my digital snow photo, which, because it was still snowing and overcast, came out too dark.
There are at least 3 ways to open the Xara Picture Editor. 1) Utilities > Xara Picture Editor.... 2) Right click on a bitmap and select Xara Picture Editor... from the fly out menu. 3) Double click on the photo or bitmap. As you are all adults, I'll let you determine which way works the best for you.
Inside the Xara Picture Editor, click the Levels icon (shown above). Note the check mark at the left side of the buttons. You press this check when you are finished editing to apply the changes to your image.
The Levels dialog has a histogram in the center that represents the distribution of values from dark (far left) to light (far right). The 3 triangular sliders can be moved to more evenly distribute the lights, darks and middle values.
The blank area to the right of the tallest peaks affirms what we can already see, that the lighter part of the image is too dark and that most of the values are in the middle values range.
You can opt to let Xara automatically even out the lights and darks and mid tones by pressing Auto. This is always a good place to begin. If the results look OK then press the red check mark button on the Xara Picture Editor tool bar to accept the change and close the Picture Editor. The results shown above have a heavy blue-green cast which is not what we want.
Moving the light values Input Level slider to the left makes the white brighter and is a pretty good solution. TIP: To see the before and after affect, press the Compare button to toggle between before and after. If you make several adjustments and believe you are worse off than when you started, press the Reset button to go back to the original photo. All modifications you make to an image inside the Xara Picture Editor remain with that image and you can go back in 5 minutes, 5 days, or 5 years (perhaps forever) and remove or alter the modifications in Xtreme Pro. The exception to this is if you convert the image to editable shapes or if you create a bitmap copy of the image. The settings will not be available on the bitmap copy , just the original.
The 3 small eye dropper icons let you determine a black, gray, and white point for your image. In the image above, I am about to click the Pick White eyedropper on an area of my photo that should be white. The 3 pick eyedroppers are best used on parts of an image that you know to be black, white or gray. You can use one, two, or all three droppers, or none at all.
And here is what my image looks like after I used the Pick White operation.
My photo might have had strong bluish cast which is common for photos taken in overcast conditions. In this case you can decide which part of your photo would represent a neutral gray, and use the Pick Gray eyedropper to get rid of the the bluish cast. In the above example, I am picking the shadow side of the snow on the mailbox.
And here is the result of the Pick Gray operation.
If you mouse over the image above, you can see the before and after. TIP: When you are working with a snow image, an image of clouds, or any image with close values that hold the detail, be careful not to loose the detail when you modify the image. Pay attention to the subtle detail , for example the mid tones in white clouds. If you begin to loose the detail and shape then back off a bit. When you use Levels in Xara Picture Editor, the modifications you make are previewed in the Xara Picture Editor preview window and not on the actual image. To accept the changes, press the red check mark icon to accept the changes. If you press the icon and then decide your edits look atrocious, just press Ctrl z or Edit > Undo. The best way to learn about the Levels filter is to use it on actual photo bitmaps. You can't ruin the photo and as mentioned previously, you can always press Reset (for Levels ) to return to the original photo.
|
||
|
|