 |
 |
 |
 |
 |
 |
 |
 |
Xara X. Chapter 1
This month we kick off the first series of Xara X feature reviews. Over the coming month's, and for as long as it takes, your editor will attempt to explain how Xara X works. Many of you old timers will know much of this already, but with Xara X's sure-to-be newfound fame, we're going to have a lot of new users who are going to need all the help we can give them. And, if you are like me, you just might learn a thing or two you didn't know, and rediscover a few things you already knew, but have long forgotten.
I have added colored rectangles to highlight the different areas.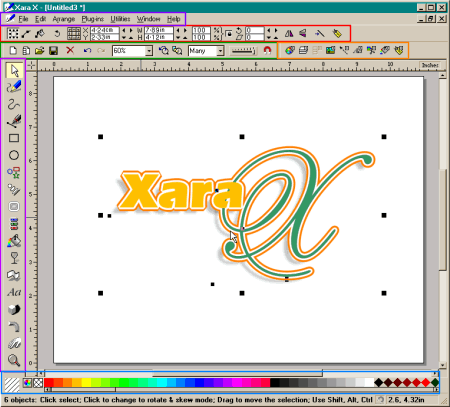 Shown here is a one half-sized image of
the Xara X window.
Shown here is a one half-sized image of
the Xara X window.
On the very top of the screen are the standard Windows pull-down menus. The most important of these is the Help menu. If you ever get lost and need help with something, this is the first place to look. The area outlined in red is known as the Infobar. The information shown here is context-sensitive, which means that the information changes depending upon the selected tool or effect. Beneath the Infobar is the Standard Toolbar which includes many features common to most functions. The area in orange contains the Galleries. On the left is the Main Toolbar. Current users will see some new tools have been added. The area along the bottom of the page is the screen palette. The square colors are Xara's standard named colors and shades of black to white. The diamond shaped colors are Web safe colors that display consistently on all computer platforms.
This month we'll begin by looking at the Pull-down menus and a brief explanation of what is contained within each one.
Many of Xara's Toolbars are known as "tear off" toolbars because you can physically drag them from their docked position and onto the screen as I have done
here with the Main Toolbar, which is normally docked on the left side of the screen. Mac users will appreciate this as most Macintosh applications have similar floating palettes or menus. Dragging on the outside edges allows
you to custom configure the floating toolbars making them wider or taller as desired. You can drag a floating palette anywhere on the screen or drag it to any edge and dock it. Brief Tool descriptions:
 From top to bottom, from left to right the tools are: Selector Tool, Freehand and Brush Tool, Shape Editor Tool, Pen Tool
, Rectangle Tool, Ellipse Tool, Quick Shapes Tool, Blend Tool, Contour Tool, Button and Nav Bar Tool, Fill Tool, Transparency Tool, Mould Tool, Text Tool,
Shadow Tool, Bevel Tool, Push Tool, and Zoom Tool.
From top to bottom, from left to right the tools are: Selector Tool, Freehand and Brush Tool, Shape Editor Tool, Pen Tool
, Rectangle Tool, Ellipse Tool, Quick Shapes Tool, Blend Tool, Contour Tool, Button and Nav Bar Tool, Fill Tool, Transparency Tool, Mould Tool, Text Tool,
Shadow Tool, Bevel Tool, Push Tool, and Zoom Tool.