It's time to assemble an isometric object which has a depth of
.67". There are three main steps: 1) Create the face, 2) Draw an axis, 3) Construct the side which is tangent to the face. I have included the point and centers of objects in the diagrams below as an aid to
understanding the assembly process.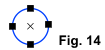 Fig. 14 Draw a circle.
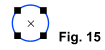 Fig. 15 Rotate the circle 45 degrees
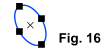 Fig. 16 Scale Height = 86.6%; Skew Angle = -30; Rotation Angle = -30
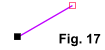 Fig. 17 Draw an Axis: Line Length = .67"; Line Angle = -150
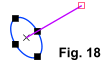 Fig. 18 Enable Snap to Objects. Use the Selector Tool (F2) and position axis to center of
ellipse (or to one of its points).
Fig. 18 Enable Snap to Objects. Use the Selector Tool (F2) and position axis to center of
ellipse (or to one of its points).
 Fig. 19 Clone the ellipse (Ctrl + K
). With the Ellipse Tool, drag the clones's center to the end-point of the axis.
Fig. 19 Clone the ellipse (Ctrl + K
). With the Ellipse Tool, drag the clones's center to the end-point of the axis.
 Fig. 20 Convert the rear ellipse to an editable shape (Ctrl + Shift + S), and with the Shape Editor Tool (F4) drag the rear ellipse's "inside"
point to the opposite end-point of the axis.
Fig. 20 Convert the rear ellipse to an editable shape (Ctrl + Shift + S), and with the Shape Editor Tool (F4) drag the rear ellipse's "inside"
point to the opposite end-point of the axis.
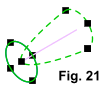 Fig. 21
Clone the front ellipse, then select it and the distorted ellipse, and Combine Shapes > Add Shapes (Arrange menu or Ctrl + 1).
Fig. 21
Clone the front ellipse, then select it and the distorted ellipse, and Combine Shapes > Add Shapes (Arrange menu or Ctrl + 1).
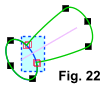 Fig. 22 While the new shape is still selected, select all its points and click the
 icon in the Infobar (or type Z) to assure all the points are Cusp Join points, then marquee-select
the points in the area indicated and press the Delete key on your computer's keyboard.
icon in the Infobar (or type Z) to assure all the points are Cusp Join points, then marquee-select
the points in the area indicated and press the Delete key on your computer's keyboard.