 |
 |
| H 1 2 3 4 5 6 |
|
|
|
Last month in the woven cloth tutorial, I created many more steps that necessary as Judi Assony was polite enough to point out. "Why not just create a small bitmap section of the pattern and use the Bitmap Gallery to apply the fill and do the resizing and transparency operations?" Judi asked. Now why didn't I think of that?! Below is an example of what Judi was suggesting.
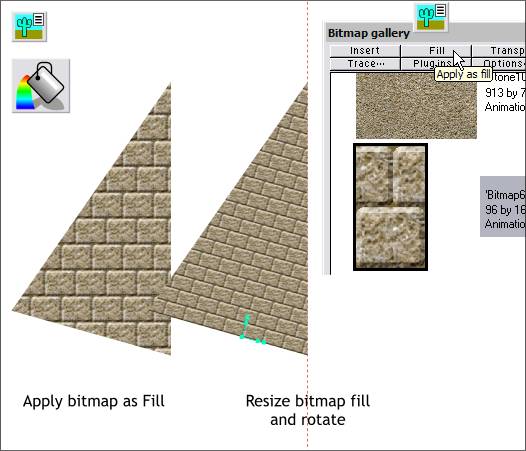
Create a small section, as you did in last month's tutorial. Create a Bitmap Copy. Select the object to be filled. Open the Bitmap Gallery, select the fill and press Fill. Select the shape with the Fill Tool and edit the size of the fill pattern as needed. We'll use this technique to create a stone pyramid.
Step 1 Draw a square, rotate it 45 degrees and reduce the vertical height to about 1/3.
Step 2 Drag a guideline from the left screen ruler through the center of the diamond shape (Press Ctrl L to display rulers). Using the Shape Editor Tool, draw a triangle using the bottom left side of the diamond shape and the guideline as shown. (Delete the diamond shape).
Step 3 Using the Rectangle Tool, draw a rectangle about the size shown above. Click the Curved Corners icon on the Infobar to round the corners. With the rectangle selected, open the Fill Gallery > Stones section, select Stone 4 fill and press Fill. Select the rectangle with the Fill Tool to enable the bitmap control handles. Drag the handles towards the center until the fill looks like the example above. TIP: When you have selected the filled rectangle with the Fill Tool and the arrows appear, hold down the Shift key and repeatedly press the left arrow key on the keypad to reduce the fill size. Use just the arrow key for finer adjustments. Select the shape with the Bevel Tool and apply a Flat > Outer bevel.
Step 4 Make two duplicates (Ctrl d) of the rectangle and arrange them as shown above. Draw a brown rectangle that covers the entire top rectangle and extends to the bottom of the two duplicate rectangles. Send the rectangle to the back (Ctrl b). Select the four rectangles and Arrange > Apply ClipView. Right click on the ClipView and select Create Bitmap Copy... Select True Color and change the Resolution: to 200. Press Create. A copy of the bitmap will be placed in the Bitmap Gallery . (Delete the ClipView).
Step 5 Select the triangle. Open the Bitmap Gallery, select the section of the three stone rectangles and press Fill. Switch to the Fill Tool to enable the fill path control handles, and resize and rotate the fill as shown. TIP: You can press the right arrow key to reduce the size of the fill. Use the up and down arrow keys to rotate the fill.
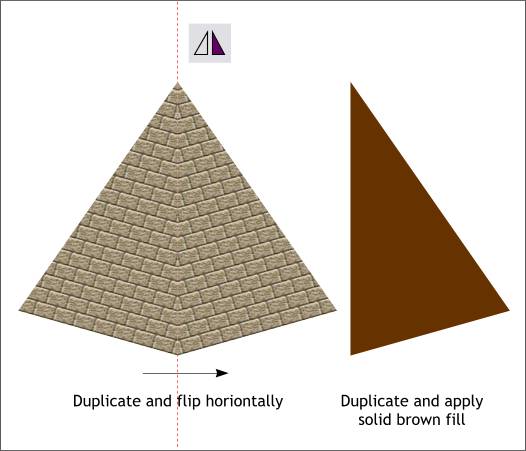
Step 6 Clone the triangle (Ctrl k) and press the Flip Horizontally icon on the Infobar to flop the triangle. Align it with the left side. Clone the right triangle and click on a deep brown color on the on screen palette. (The bitmap fill will be replaced with the solid brown fill).
Step 7 Select the brown rectangle with the Transparency Tool. Drag from the left side on a parallel path to the lines of the stones as shown and a little past the edge of the side. Click the starting control point and change the Transparency slider setting to 50%.
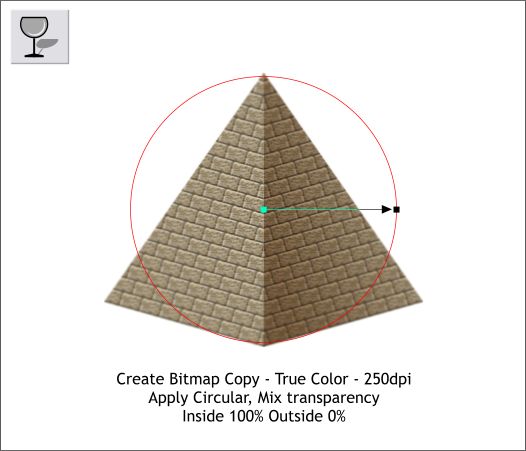
Step 8 (Optional). Create a bitmap copy of the pyramid, True Color and 250dpi. Hold down the Shift key and press Create to place the bitmap on top of the original. Using Sean Sedwards' SS Blur plug-in filter (Available here) apply a Medium Gaussian Blur. (Refer to Xara's Help file for information on installing and using Plug-in filters). Select the bitmap copy with the Transparency Tool. Apply a Circular, Mix transparency. Change the inside slider setting to 100% (totally transparent) and the outside slider setting to 0% (opaque). This adds a more photographic look to the pyramid.
|
|
|
|
|
|
|