 |
 |
 |
 |
 |
 |
 |
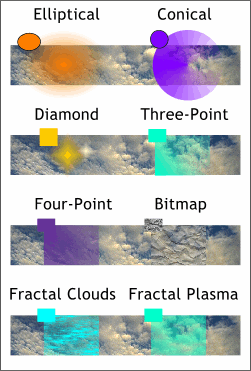
 The other Transparency Shapes
operate much like their Fill Tool counterparts as shown here. All transparency shown with Mix Transparency Type.
NOTE: To apply a Bitmap Transparency, select the object to which you want to add transparency, open the Bitmap Gallery, select a bitmap preview image, and press Transparency
. The bitmap size may be modified as well as degrees of transparency. NOTE: A copy of any bitmap created in, or ![]() imported into, Xara resides in the Bitmap Gallery (on the Infobar) even if the bitmap has been deleted.
imported into, Xara resides in the Bitmap Gallery (on the Infobar) even if the bitmap has been deleted.
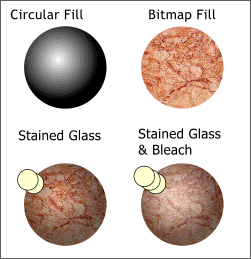
A Circular Fill is applied to a circle A marble bitmap fill is applied to a second circle.
The grayscale circle is centered on top of the marble-filled circle and Stained Glass Transparency, amount 30% applied. The circle is duplicated (Ctrl K) and the Transparency type
changed to Bleach. Stained Glass transparency produces the shadow portion of the sphere while Bleach produces the highlight. Transparency can be applied to grayscale fills to produce a 3D effect as seen on the left.
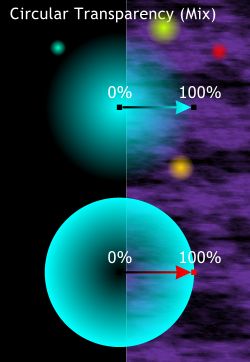
The settings on the bottom circle have been reversed.
Settings in between 0 and 100% produce corresponding amounts of transparency. Circular Transparency
can have two very different appearances depending upon how you set the starting and ending transparency amounts. The top circle is the same size as the bottom
circle and represents the default setting for Circular Transparency. This default setting produces a flare or glowing effect.
Tool Review Continued on the Next Page