|
Animation Basics Step-by-Step
STEP 1. Click on any blank area of the page with the right mouse button. (Not the correct mouse button, the one opposite the left mouse button). From the pop-up menu select Page Options. Click the Units tab and change the Page Units to Pixels. Click the Grid and Rulers tab. Change Major Spacing to 100pix (no space), and Number of Units to 10. Click OK.
| |
|
STEP 2. Click on any blank area of the page once again, this time select the Snap To Grid option from the pop-up menu. Because Web images are measured in pixels, if we create a shape with an even number of pixels, we'll get a cleaner image on the web. Enabling Snap To Grid forces any shapes we create to nearest 10 pixels. If you don't see rulers on the top and left side of the page, open the Window menu and select Bars...Rulers. Drag two horizontal guidelines (from the left vertical ruler) onto the page spaced 200 pixels apart. From the top ruler, drag two guide lines spaced 220 pixels apart. Obviously this is easier if your units are set to pixels.
| |
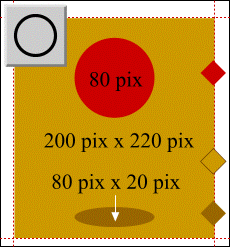
Step 4. Marquee select (drag a rectangle outline around the elements with the Selector Tool) the rectangle, the circle and the ellipse. From the Arrange menu select Alignment. From the Horizontal Positions window select Align Centrally . Click Apply.
| | |
Step 5. Select the rectangle and click on the small color wheel icon to the left of the screen palette to open the Color Editor. Select RGB Color Model from the drop-down list. Key in 204 for R, 153 for G and 0 for B. Select the ellipse, and change the RGB values to R=153, G=102, B=0. NOTE: The color model will default to HSV unless you change it in Page Options. It's a bit of a nuisance, but I think creating colors is easier in HSV mode, so I leave the default Color Model as is. Change the ball to R=204, G=0, B=0.
| | |
|
This is a good time to Save your file. Saving a file in Xara is the same procedure for saving a file in any software on any computer platform so I'll not cover it here. As you've probably been concentrating very hard trying to take in all these new moves, take a short eye-break and reward yourself with a modest glass of Chateau Petrus 1974, or libation of your choosing.
|
|
©1998 Gary W. Priester
This lesson may not be copied, altered, republished or distributed in any type of media without the express written permission of the author.
