|
|
|
|
|
||||
 |
|||||
|
Have we done enough GEL effects yet? Of course we have not. In last month's tutorial I recreated a GEL text effect that was created with Auto fx DreamSuite Gel Series plug-in. At the time, I did the effect in Photoshop because I did not believe that Xara would support a 32-bit plug-in. And while in reality it cannot, one of the more astute members of the Xara Conference pointed out that if you exported the shape from Xara as a PNG file with Alpha channel transparency, that the image would come into Gel Series with the transparency in tact. It is really easy. Of course you will need a copy of Auto fx Dream Suite Gel Series to do this tutorial. At the end of the tutorial, I'll tell you how you can win a free copy!!!
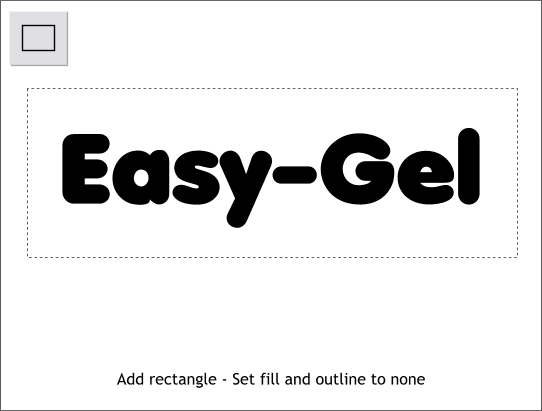
Step 1 Create some text, or any black and white shape, to which you want to apply a GEL effect. The font I have used, Valken, is on the Xara CD in the Fonts folder.
Step 2 Add a rectangle behind the text or object that is a bit larger all around as shown. Set the fill and outline to none.
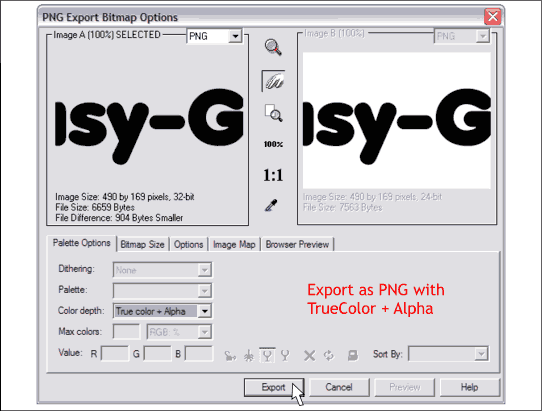
Step 3 Select the invisible rectangle and the text or shape and from the File menu, select Export. Determine in what folder you want to save the image and from the Files of Type: drop down list, select PNG (.png). Press Export. In the PNG Export Bitmap Options dialog, the default Color Depth is TrueColor + Alpha which is what we want. Press Export.
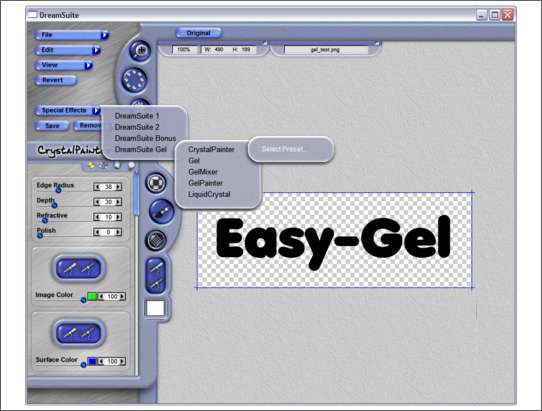
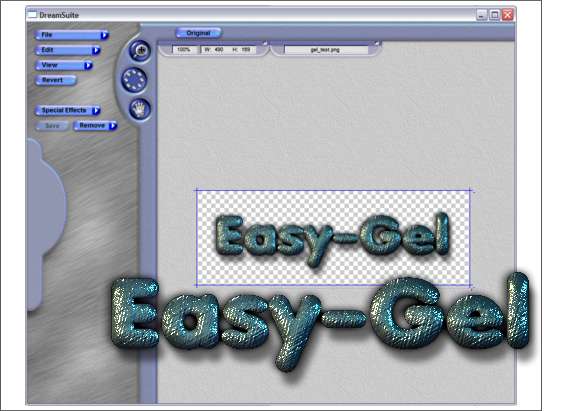
Step 4 Open the image in DreamSuite Gel Series by pressing File, then browsing to, and selecting your PNG file. From the Special Effect fly out list select DreamSuite Gel, then from the DreamSuite Gel fly out, select one of the five options.
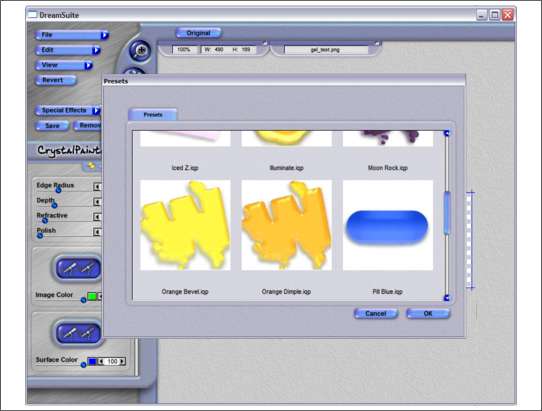
Step 5 The preset effects shown above are from the Crystal Painter series. Select one and press OK.
Step 6 The effect is applied to the PNG file. You can apply as many different effect as you want until you find one with which you are happy. (The effects are not accumulative, that is you can only apply one final effect per session. You can however apply an effect, save the image then open it again and apply a new effect over the first). When you are satisfied with your effect press Save. DreamSuite saves the effect with the transparency in tact. You can import the effect into Xara and add it over any background as I have done at the bottom of the screen capture.
WIN A FREE COPY OF AUTO FX DREAM SUITE GEL SERIES. How? It couldn't be easier. Just send in the response form on the next page and flatter me a little bit. I, or one of my assigns, will pick one or two winners depending upon how generous the folks at Auto fx are. The winning entry or entries will be selected before the next issue of the Workbook. In addition to the Gel Series, Auto fx offers two series of plug-in filters, DreamSuites I and II which have some really awesome effects that go well beyond the usual image distortions. Another really useful program from Auto fx is called AutoEye 2.0. This does automatically what I demonstrated in the washed out and dark photos tutorial plus some additional filtering such as zoom blurs and grain. I have a copy of AutoEye 2.0 which I use to correct my photos that I take with my digital camera and which never fail to be greatly improved without my lifting a finger, automatically. All these Auto fx products work either as a Xara plug-in or independently as a stand alone application. The only advantage to using them as a Xara plug-in is when you save the image, the effects are applied and the image is returned to Xara. But because of the proprietary interface all the editing is done in Auto fx's interface, I prefer to use the applications in the stand alone mode. For more information on this line of products, visit www.autofx.com. |

|