 |
 |
| H 1 2 3 4 5 6 |
|
|
|
This is a fun and easy project in which we'll take a bright, colorful photograph and add about one hundred year's worth of aging and fading. Here' how.
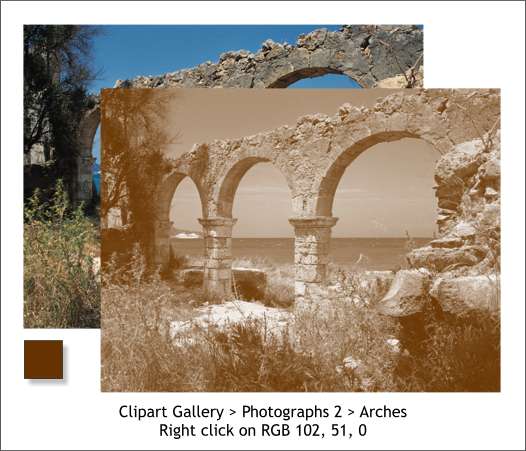
Open the Clipart Gallery (The scissors and image icon on the top left area of the Infobar). Select the Photography 2 folder and then select the Arches image. Press Import or just drag the image from the gallery onto the page. New users: If you open the Clipart Gallery and there is nothing there, place the Xara X CD in your CD player. Open the Clipart Gallery. Click the Disc Clipart... button. Xara will attempt to locate your CD drive. If it cannot find your CD drive, press Find CD and locate the drive yourself. Find the Clipart folder on the CD and double click on the folder icon, then press Add. Xara will add the folders and icons for all the clipart in the Clipart Gallery. To access the images, you need to have the Xara CD disc in your CD drive. Select the Arches image. Locate a dark brown color on the screen palette and right click on the color. This creates an instant sepia-colored photograph.
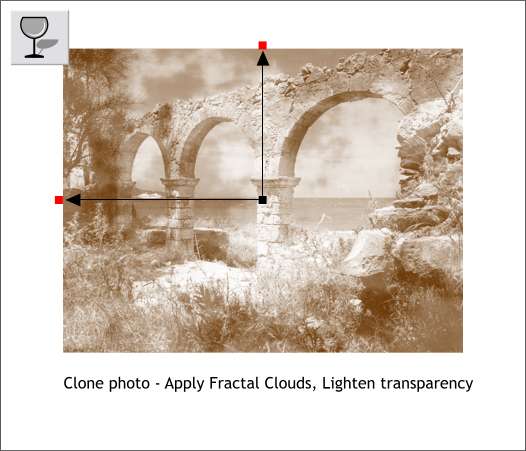
Clone the photograph (Ctrl k). Select the Transparency Tool then select Fractal Clouds from the Transparency Shape drop down list and select Lighten from the Transparency Type drop down list on the Infobar. Adjust the size of the transparency by dragging the ends of the arrows as shown. This creates a random faded effect.
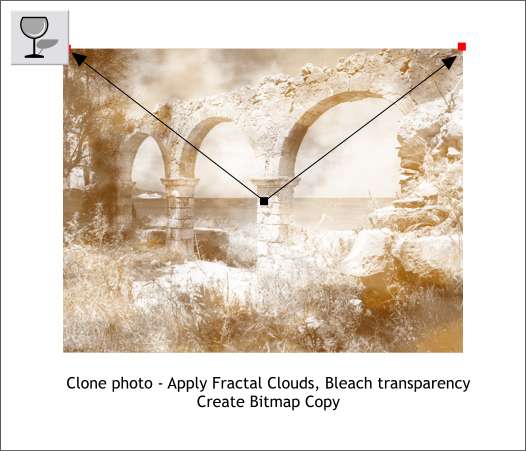
Clone the cloned photo (Ctrl c). Select it with the Transparency Tool and change the Transparency Type to Bleach. Arrange the fill path arrows as shown to increase the blotchy faded look. Select the top image. Select Create Bitmap Copy... from the Arrange menu. Select True Color (not True Color + Alpha) from the drop down list and press Create. Delete the other three images.
Apply a Fractal Clouds, Stained Glass transparency to the bitmap copy. Click on the control handle on the top (the small box at the end of the arrow) and move the Transparency slider on the Infobar to 60% . Select the center control handle and change the slider setting to 20%. Create a new Bitmap Copy, with True Color color depth. Delete the old bitmap. Now the photograph looks even older and more faded.
Using the Rectangle Tool, draw a rectangle that is a little larger all around than the photo image (indicated by the blue dashed outline). Apply a Fractal Clouds fill using the two colors shown and adjust the fill path arrows as shown. New users: To mix the colors shown, open the Color Editor (Ctrl e or click the small color wheel icon to the left of the screen palette). Click the outside control handle (square). Select RGB Color Model from the drop down list and enter the first number in the R text entry box, the second color in the G text entry box and the third color in the B text entry box.
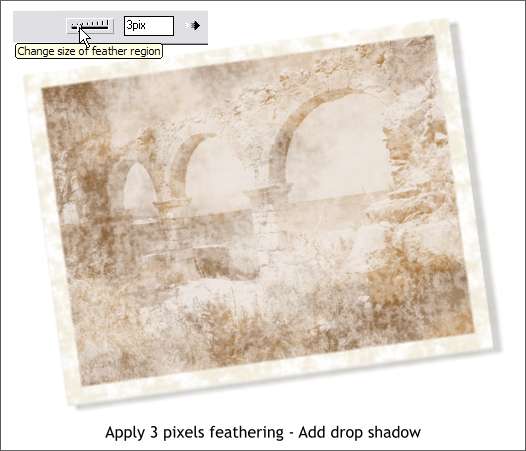
Place the faded photo in the center of the rectangle. Select both and move the feathering slider to about 3pix to soften the edges. Select the rectangle then select the Shadow Tool and apply a Wall Shadow. Instant aging.
|
|
|
|
|
|
|