|
Back in the early 90s when I was first getting my feet wet in graphics software and the computer, I needed to create a brass plaque for a project I was designing for a California winery. It was one of my first "grown
up" projects created with the computer. Here is a recreation of the plaque I created.
We will be using Pixels as our units of measure. Right click on the screen and select Page Options... from the pop up menu. In the Units tabbed section, select Pixels for the Units
and 0-255 for the Color Units. In the Grid and Ruler tabbed section set the Major Spacing to 100pix (key it in exactly like this please) and the Number of Subdivisions to
10. Press OK to close the dialog and apply the changes. Press Ctrl L to show the rulers.
NOTE:
From time to time I may apply arbitrary colors to objects. I do this to make the objects easier to see. If I do not specify a fill for an object, you do not have to apply a fill or outline color.
When I show an ellipse or rectangle that has just been created, that has no fill, it is because I have set the fill to none before I exported the illustration. By default, all
ellipses, rectangles and Quick Shapes have a black outline and a black fill. There is nothing wrong with your copy of Xara.
Step 1 Using the Rectangle Tool, create a rectangle 480 pixels wide by 120 pixels tall. You can adjust the exact width and height settings on the Infobar at the top of the screen before
deselecting the rectangle by changing the numerical values shown in the Height and Width text entry boxes.
Step 2 Select the rectangle and set the line width to none by right clicking on the cross hatched box to the left of the screen palette (left clicking sets the fill to none).
With the rectangle selected, select the Fill Tool and then select Linear from the drop down list of Fill Types on the Infobar. Drag
the ends of the fill path arrow until the fill path arrow is vertical.
Open the Color Editor (Ctrl e). Select RGB Color Model from the drop down list of Color Models. Click the square at the top end of the fill path arrow to edit the color. Enter the three
values shown above (210 in the R box, 200 in the G box and 115 in the B box. Press the Tab key to select the other control point
and enter the three values shown for the pale yellow square.
Step 3 Select the rectangle with the Bevel Tool and from the drop down list of Bevel Types on the Infobar, select Flat.
Click the icon on the Infobar with the four arrows pointing to the center to change the bevel direction to an Inner Bevel. Slide the Contrast slider to 80%.
From the drop down list of Slider Types on the Infobar, select Size. Change the bevel size to 2pix. Press Enter on your keyboard to apply the changes.
NOTE: Dragging the red arrows away from the selected object intuitively creates an outer bevel. Dragging any of the red
arrows (it does not matter which you drag) creates an inner bevel). You can tweak the effect using the Slider controls found in the Slider Type drop down list on the Infobar.
Step 4 Create a new rectangle to the size shown. Press the Curved Corners icon on the Infobar (the arc icon) to apply rounded corners (the default curvature is 0.2 so you don't need
to change this). Set the line width to 4pts and change the outline color to the dark green color shown above.
HOW TO: To change the line width, select 4pt from the Set Line Width drop down list on the Infobar. Left click the cross hatched
box to the left of the screen color palette to set the fill to none.
NOTE: In order for the rounded corners to be perfectly round, you must create the rectangle to the exact size, or very close to
it. Draw the rectangle slowly and use the settings on the Infobar to get as close as possible to the exact size, then use the Height and Width text entry boxes to adjust the final size before
you apply the corner curvature.
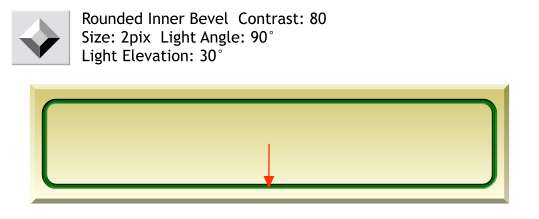
Step 5 Select the rounded rectangle and from the Arrange menu, select Convert Line to Shape. (This changes the outline into a fillable shape). Select the green outline shape with Bevel Tool
and drag towards the center to apply an Inner Bevel. Drag the Light Angle handle (the red arrow in the center) until it is pointing down. This will give the green outline shape the
appearance of being recessed into the plaque instead of raised.
Set the Contrast slider to 80. Change the Size to 2pix and the Bevel Type to Rounded. From the Slider Type drop down list select Light Elevation
and move the slider setting to 30 degrees. Press Enter to apply your changes.
Save your work and take a short eye break.
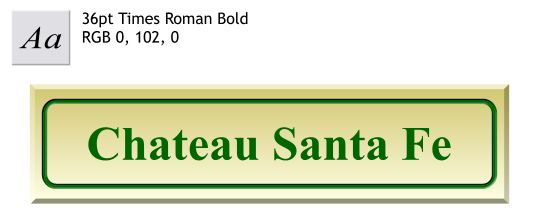
Step 6 Using the Text Tool add the text Chateau Santa Fe (or any text of your choosing) in 36pt Times Roman. Press the B icon on the Text Tool Infobar to change the weight to Bold.
Change the color to RGB 0, 102, 0 (dark green).
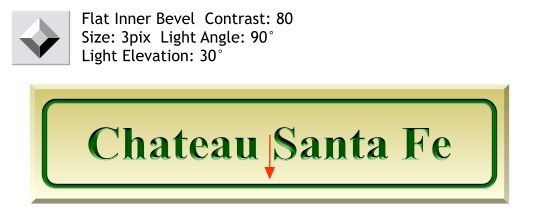
Step 7 Using the Bevel Tool, apply an inner bevel and use the settings shown above. As with the rounded border shape this gives the text the appearance of being engraved.

Step 8 The plaque looks like it wants to be on a classy surface. I added a rectangle behind the plaque and applied a Grain 8 fill from the Wooden Fills folder in the Fill Gallery.
NOTE: The fills are on the Xara X CD. If you do not have any fills in the Fill Gallery, insert the Xara X CD in your CD drive, open the
Fill Gallery and press Disc Fills... If Xara does not automatically find the Fills folder on the CD, browse to the CD and the Fills folder. Double click on the Fills
folder icon and then click Add. Xara will add folders for all the fills and thumbnail images for each fill. The actual fills remain on the CD and the CD has to be in the CD drive to apply the fills.
Step 9 The plaque looks pretty good on the wood, but it looks a little flat and undramatic. We can add a light source to improve the image.
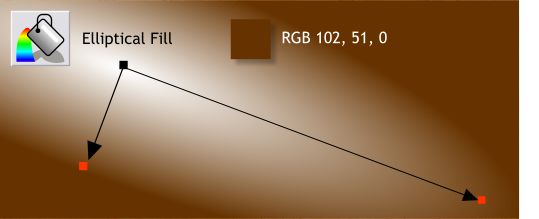
Create a rectangle the same size as the wood filled rectangle. (Press Ctrl k to make an in place duplicate). Change the fill to RGB 102, 51, 0 and then apply an Elliptical Fill stretching the fill
path arrows as shown here. The inside color will default to white which is fine.

Step 10 Select the rectangle with the Transparency Tool (the wine glass icon) and apply a Flat, Stained Glass transparency.
HOW TO: If you are not familiar with the Transparency Tool, select the Transparency Tool (the wine glass icon on the main
toolbar) and click the elliptical-filled rectangle to select it. From the Transparency Shape drop down list on the Infobar, select Flat and from the Transparency Type drop down list (the next
drop down list to the right) select Stained Glass.
And that's it! A lot easier and more effective than my first attempt over ten years ago!
|
