


A Tips and Tricks Tutorial by Gary Bouton (Gare online)
Edge Lighing
In addition to the many angles of lighting demonstrated in this month’s video tutorial, there’s an additional one commonly called Edge Lighting. Edge lighting can be particularly effective in designing portraits because of the artistic effect it imbues, teasing, hiding and partially revealing your subject.
This month you’ll lean a formula, a recipe for drawing edge lit portraits of people. This formula can be applied to just about any photograph you have of a person as long as they are in side and not full face view. As an example, the download file this month includes an image of a brass bust of a man whose portrait has been on Untied States pennies for as long as I can remember. Abraham Lincoln’s profile is highly recognizable by his beard, the shape of his nose, and the tall forehead. You almost don’t need more details of our 16th President to successfully convey his image in an edge lit treatment.
Figure 1 here shows very typical, very bland outdoor lighting on the sculpture of Lincoln. The eye is almost overwhelmed by the amount of visual data and it can actually take a few moments for the audience to realize that this is a bust of Abe Lincoln. This strongly suggests that a simplified version of his profile will m ore quickly communicate the image and whatever visual message goes along with it.
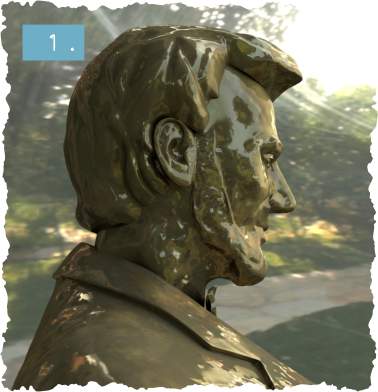
Figure 1: A brass bust of Lincoln contains geometry, textures, reflections and almost too much detail for a well-balanced composition.
The same scene, except that it’s illuminated in Figure 2 now with a single light source, pointing directly left into the scene, reduces the bust of Lincoln to its essentials.
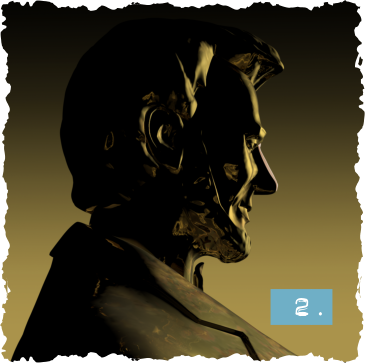
Figure 2: Edge lighting brings drama and simple, direct, yet artistic properties to the subject in the scene you create.
I’ve saved you some time this month; if you want to create your own edge-lit portrait of a friend, enemy, or client, you’d photograph the person in profile, and then manually trace their profile with the Shape tool in Xara. And then follow the steps in this article. But if you’d like to honor our president as a warm-up to your skills (the correct answer is: yes, I do), then open the Lincoln.xar file and I’ve traced a profile and you can get down to work, as follows:
- With the Selector tool, choose the face shape, and then click the white swatch on the color line. This will serve as a highlight shape for the edge-lit composition, see Figure 3.

Figure 2: Edge lighting brings drama and simple, direct, yet artistic properties to the subject in the scene you create.
- Press Ctrl+K to Clone (copy) the white face shape and then fill it with solid black, the same as it was originally, but now there is a white duplicate beneath it
- I encourage you to import the Lincoln edge lit.png image from the Zip archive that accompanies this tutorial, scale it and put it next to the shapes, and then with the Selector Tool, right-click on it and choose to lock it (to the page). The image makes good reference for the steps to follow
- To approach this with a little more aesthetics than simply imitating perfect 90 degree edge-lighting, pretend that the light source for your drawing is coming in from the right and just a little downward. Which means that the areas highlighted in Figure 4 will not be illuminated, thus creating better, more recognizable detail in the portrait
- With the black profile chosen, take the Shape tool, and marquee-select the upper control points on the forehead area. Then, either nudge these selected nodes to the left, or drag them. Working down the profile, select the upper control points on the nose area, and then move them to the left. Notice in Figure 4 that the bottommost nodes in the forehead and nose areas are not selected and they serve to anchor a black area, which represents and unilluminated area in this edge-lighting composition.

Figure 4: Suggest edge lighting by moving certain control points to the left, making the underlying white shape visible.
- Repeat step 5 with the beard area, and perhaps Lincoln’s hair on top.
Now, here’s the formula part of this composition: Look at the image that’s locked on the page. For more decades than I care to remember, cartoonists have been drawing edge-lit characters with two additions to what you’ve already done with the profile. People’s cheekbones and their ears catch side-lighting, and drawing these as shapes is easy to do and you don’t even have to be particularly accurate as long as the profile itself looks like your subject.
- With the Freehand and brush tool, draw an arc as shown in Figure 5, to represent Lincoln’s cheekbone. The Freehand tool is good for this task because it adds a little randomness to your stroke, thus a more natural appearance. You might want to use the Shape tool afterwards to refine your cheekbone highlight shape a little.

Figure 5: draw an arc shape, facing left, to suggest a highlighted cheekbone.
Note: If you can’t see a preview of the shape you’re drawing against black, draw the shape outside of the black area and then drag it into place with the Selector tool.
- You need only two or three more arc shapes to represent the parts of the human ear that stick out and will catch edge-lighting are the outermost part–called the helix–and the part that sits right in front of an ear plug, called the tragus. With the Freehand tool, draw these shapes as shown in Figure 6, position them appropriately (use the imported picture for reference), and fill these shapes with white

Figure 6: The human ear can be described in an edge-lighting situation with two or three arcs
- Finally, the suggestion of a pupil captured on edge and the top eyelid will complete this drawing. Basically, the shape is a triangle representing the upper eyelid, with a slender triangular shape descending from it to suggest an open eye. See Figure 7 to get an idea of the shape and what the finished illustration looks like.

Figure 7: Add a shape that suggests an arrowhead pointing at the eyebrow to represent the eyelid and eye.
- Press Ctrl+S to save your work and then press Ctrl+P to print a copy
- Take the print to the movie theater and see how closely it resembles Daniel Day-Lewis.
Use this set of steps on any profile photo you’ve taken, and it’s the 150th anniversary of Lincoln’s Gettysburg address in a few months. Well-written, Mr. President!
Discuss this tutorial and show the work it inspired in the Xara Xone forum on TalkGraphics.com


