


A Designer Pro X9, Tips and Tricks tutorial by Frances Proctor (“angelize” online)
Guiding Your Way
A Look at Guidelines, Guide Objects and Guide Layers
You’ve just opened up a new blank document in your favourite Xara program, your coffee cup is filled, and you’re all set to create the design of your dreams. Oh, Dread, though; you’re facing a sea of white! Where do you start the first text column? How do you divide your page into sections?
A look at guidelines, guide objects and guide layers
Whether you are laying out a poster or business cards, or even a website, sometimes you need some guidance, and guess what? That’s where guidelines, guide objects and guide layers come into play.
A Guide to Guidelines
Let’s begin with the Guides layer. This is a special layer that does not print or export, and everything on this layer is displayed as dotted outlines. There is only one Guides layer per document. New documents don’t contain a Guides layer by default; however there are two easy ways you can create one.
-
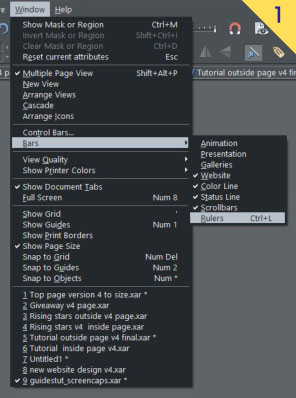
The first one is what I like to call the Ruler method. Make Xara’s rulers visible by clicking on Window > Bars > Rulers, as seen in Figure 1. Or you can use the handy keyboard shortcut of Ctrl+L to display the rulers.
-
Once you have the rulers showing, use any tool to click+ drag from either ruler to the Page or to the Pasteboard a guideline as seen in Figure 2. A guideline will be created and a Guides layer will be created if there isn’t one already in the document. Guides layers display in the Page & Layout Gallery along with all the other document layers.

-
If you are not using guidelines right away, but want to create a Guides layer to hold future Guide Object and Guidelines you can use what I like to call the Page & Layer Gallery method. Open the Page & Layer Gallery if it is not already open by pressing F10 or choosing Utilities>Galleries> Page & Layout Gallery. Make sure the Gallery is expanded (you can click-drag its edge to enlarge it) to show the layers (Click the small, white, right-facing arrow next to the page icon).
-
Right-click on any layer and a context menu appears. Click on Create guide layer and an empty Guides layer is created in the document. See Figure 3.

The Shape of Guides to Come
Now that you have a Guides layer in your document, there are two basic types of guides you can create;Guidelines and Guide Objects.
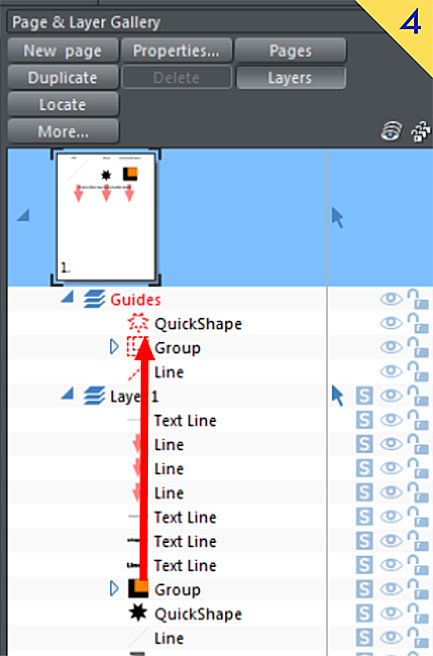
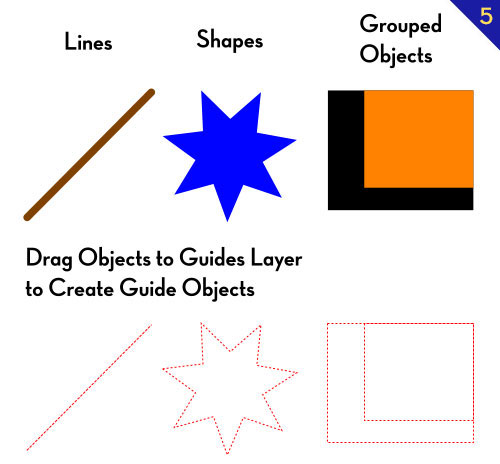
Guide Objects can be anything you can create with Xara’s drawing tools. Shapes, freeform lines, straight lines with or without rotation, and even text can be placed or created on the Guides layer and become Guide Objects. You can copy and paste objects on the Guides layer, or just drag them from the layer you created them on to the Guides layer in the Page & Layer Gallery. See Figures 4 and 5.
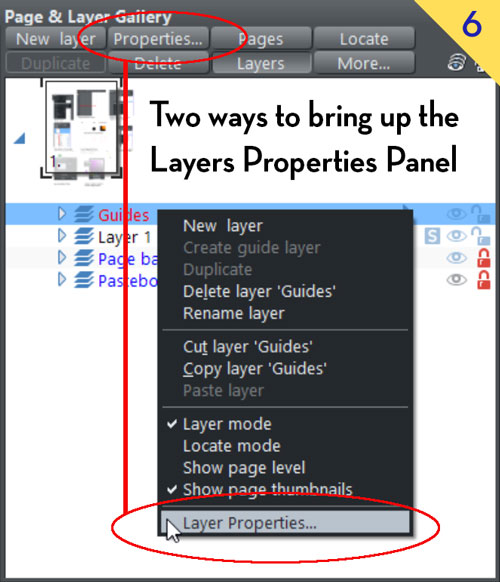
The Guides layer also has some interesting properties you can set in the Layer properties panel. You can bring up the Layer properties panel by clicking on a layer in the Page & Layer Gallery and clicking the Properties button at the top of the Gallery. Or you could right-click a selected layer and choose Layer Properties from the context menu. See Figure 6.
Creating a Guideline with Precision
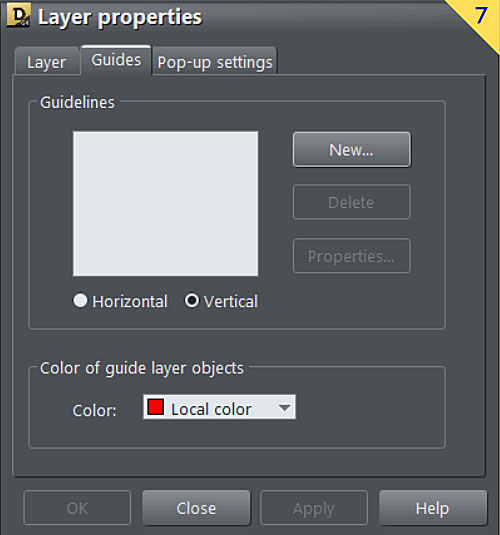
Now that you have the Layer properties panel up let’s take a look at what it can do. The Guides tab on the Layer properties panel is used to set horizontal or vertical guidelines (these are guidelines, and not guide objects) at whatever position you want. See Figure 7.
-
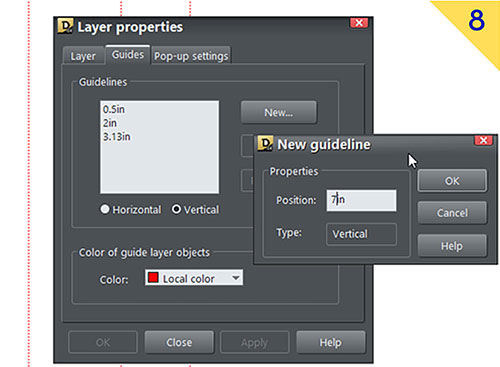
To create a guide at a precise location on the page, first click the Horizontal or Vertical radio button to choose what kind of guideline you will make, and then click New. The New guideline box pops up so you can type in Position text field the exact location where guideline will be placed.
You can use any unit of measure to specify the position in this panel, for example 10px, or15pts 1in, or 10cm, but Xara will convert that measurement you entered into the Page units that are specified in the Units tab of the Options panel (File>Page Options>Units tab>Page units).
-
Type in your position and then click OK. If you have a number of guidelines, you will see them listed in the Guidelines list box as seen in Figure 8.
-
The box shows the horizontal Guidelines you’ve placed when the Horizontal radio button is selected and the list of vertical Guidelines you’ve place if the Vertical radio button is selected. You can select any Guideline in the list by clicking on it. You can remove the guideline by clicking the Delete button. Or you can edit the position of the guideline by clicking the Properties button to bring up the Guidelines Properties dialog where you can enter a new location value for the guideline in the Position field.
Changing the Colour of Guide Objects and Guidelines
The bottom part of the Guides tab in the Layer properties panel is where you go to change the colour used to display Guidelines and Guide Objects. Notice that the Colour dropdown, by default, contains only one colour there and it’s red. But if you have named colours in your document, those named colours will be in the list too. That’s why the red swatch is not labelled Red, but instead is labeled Local Color.
Now you could pick one of the colours you’ve already named in your document if you have any, but you really should create a unique, named colour for your guides that stands out from your artwork and is clearly named. Naming your custom guide colour something self-explanatory like Guides or Guides layer colour so you won’t use that exact color in your artwork or change the color by accident. This is highly recommended and easy to do.
Here is how to set a custom color for Guide layer objects:
-
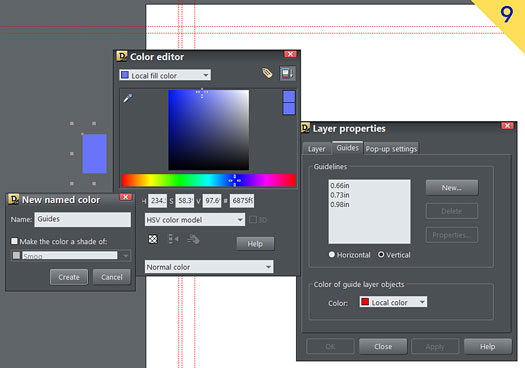
You don’t need to close the Layer properties dialog to create a named colour. Draw an object, such as a small rectangle on the Pasteboard.
-
Use the Colour editor to mix whatever contrasting colour you like for to use for guides. Click the Name tag icon and name your colour.
I like to use the obvious, but useful name Guides, as the name for the colour I choose for my guidelines as seen in Figure 9.
-
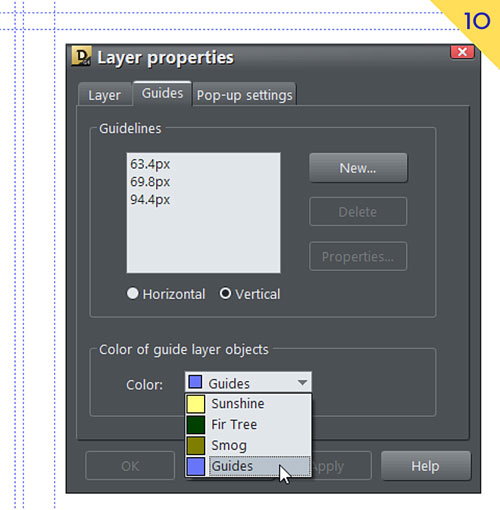
After you’ve named your color, delete the object so it doesn’t accidentally get incorporated into your artwork. Deleting the object won’t delete the named colour from the document. Xara will hang on to the named color.
-
Go back to the Layer properties panel for the Guides layer and your new colour will show now in the Color of guide layer objects’ Color dropdown list. Select the guides color you just created and watch your guides instantly change to your new colour. See Figure 10.
-
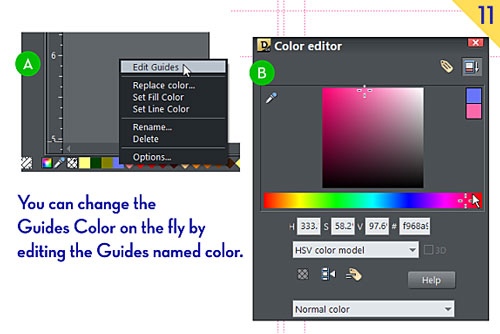
Now if you open the Colour editor and drag the Guides colour from your Color Line into the Color editor you can easily change the colour of your guides! You can also just right click the colour on the Color Line and choose Edit Guides (it reads Edit and then whatever you named your colour) to open the Colour editor with your named colour selected and ready to go. This can be quite handy if you are working on a layout or a vector art piece and you need to quickly change the colour of the guides so you can see them better. See Figure 11.
Now you should have a better understanding of Guidelines, Guide Objects and how the Guides layer works. I hope you found this useful and if you have any questions please do drop by the thread on Talkgraphics!
Discuss this tutorial and show the work it inspired in the Xara Xone forum on TalkGraphics.com

(Angelize online), is the co-publisher of the weekly, Good Morning Sunshine! that has brought a smile to the faces of print and online subscribers for 14 years. She uses Xara products extensively in her work for her firm, SunWings Graphic Design. She loves to teach and share her love of Art though her YouTube channel, her contributions to The Xara Xone and her work on Xara’s TalkGraphics forum as a moderator. You can drop her a line through her website or better yet stop by the Xara Xone forum on Talkgraphics and chat with Angelize there.
The tutorial A Look at Guidelines, Guide Objects and Guide Layers including the artwork and the downloadable examples file are Copyright © 2014 Frances Proctor. All Rights Reserved.


