


A Designer Pro X9, Tips and Tricks tutorial by Bob Taylor (online IAmTheBlues)
Playing with Fire (In a Fun, Harmless way) with Xara
Putting the effect of a raging fire inside of text is a good visual communicator from anything to spicy ethnic foods to Rock band logos, to fire sales, to a rash that only Calmitol Ointment can address. This month’s Tips and Tricks tutorial shows you how to create a fire effect and put it inside text, so both the fire and the text are easy to read, and create an impactful graphic.
Finding an Appropriate Font
In the screen captures you’ll see in this tutorial, I used Badaboom, an excellent bold comic-book genre typeface that Blambot.com is kind enough to be giving away for free. Download and install it, and in your spare time take a good luck at Blambot’s commercial (non-free) typefaces. They have some of the best lettering for comic strips in TrueType and OpenType file formats I’ve ever seen.
Freehanding and Blending some Flames
-
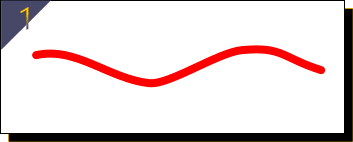
In a new document, select the Freehand and Brush tool from the drawing tools flyout (or just press “N” as a shortcut). Draw a wavy line, as shown in Figure 1.
-
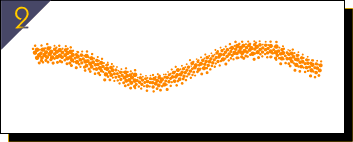
Leave this wavy line selected. Now, open the Line Gallery and you’re going to use an existing brush (you won’t have to create one). Choose the Coarse Spray in the Novelty folder in the Line Gallery list, and then set the point size to about 24 from the drop-down box at top. See Figure 2.
-
With the wavy line selected, press Ctrl+K to clone (duplicate) the line in exactly the position as its original. Now hold Shift to apply 10x the Normal nudge value to your keyboard keys (and hopefully in Options, you have the Nudge size set to its factory default of 1 pixel!), and then tap the down keyboard arrow three times.
-
Select the duplicate and clone it and repeat step 3. Now you should have three stacked wavy lines all the same colour. Let’s change this.
-
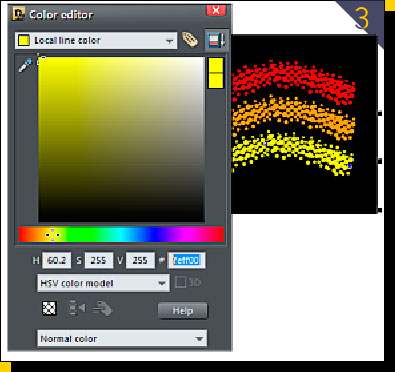
Select the top wavy line and then press Ctrl+E to bring the Color Editor up. Let’s make this wavy line a solid red. I’m going to list the hexadecimal numbers here so it’s easier to copy and paste them into the hex box on your Color Editor, than presuming your Color Editor is set up to HSV, RGB, or UPS.
-
Be sure to set the Color Editor’s top drop-down list to Local Line Color, not Local Fill Color because technically this Novelty stroke you applied is a line attribute and not a fill attribute.
-
Type ff0000 into the Hex num box on the Color Editor (or copy and paste it from this article). You don’t have to hit Enter or call Tech Support; the colour of the wavy line changes dynamically and needs very little help from you except the color value.
-
Select the middle line and then make it ff5702 by typing it or copy/pasting it
-
Select the bottom remaining line, and make it feff00. Your page should look like Figure 3, except perhaps larger.
-
Press Ctrl+S to save this document. Don’t close it yet, though. Just take a breather before we continue.
Blending Up a Fire
It will be apparent very soon how these three wavy line are transformed into flames. You blend them!
-
Choose the Blend tool from the Effects group flyout on the Toolbar. It’s the icon of a square in the background transforming to a circle in the foreground.
-
With the Blend tool, drag from the orange line to the red line. This creates a default number of blend steps of 5, but that won’t do for a smooth fire effect. Type 50 in the Steps box on the Infobar and then hit Enter.
-
With the Blend tool, drag from the yellow line to the blend group above it, and then set this number of steps to 50 on the Infobar. You should have a visual that looks something like Figure 4. Does it seem to be getting warmer in here?

Putting Fire into your Words
One way of putting fire into your words is to become a politician. But it’s much easier if you follow these next steps in Xara:
-
Choose Arrange> Convert to Editable Shapes. The shortcut (and a good one to commit to memory) is Ctrl+Shift+S. You’ll be doing something special with the fire shape later and simplifying it to accept editing is necessary.
-
With Badaboom installed and chosen while the Text tool is active, type an evocative phrase, something like “Fire Sale”, or “On Fire!”, about 80 points in height should be sufficient for most web and print headlines. See Figure 5.

-
Clone the text (Ctrl+K).
-
Select either of the blocks of text and then choose the Contour tool.
-
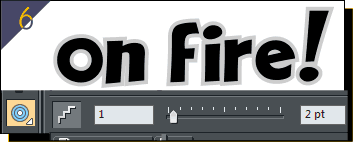
Create a 1 step Contour that travels outwards by about 2 points. See Figure 6. Make the edges Miter, up on the Infobar, not rounded or beveled.
-
You might want to nudge this Contoured text away from the original to better see what you’re doing now. With the Contoured text, select the contour (the outer) part with the Selector tool or the Contour tool; check the Status Bar to make sure the 1 Contour on Layer 1 or some such is reported and you have selected the contour. Give it a black colour.
-
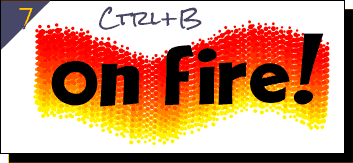
Select the original text and put it on top of the fore shape. Now it will be on top of the fire due to it being the last shape created in the document, as shown in Figure 7. No problem: Press Ctrl+B to put the text to the back of the fire and the back of the entire page.
-
With the fire shape and the text both selected, press “Q” to make a ClipView shape out of the text. See Figure 8.
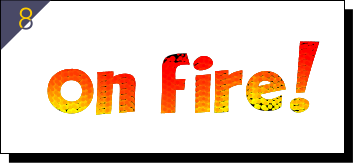
Now, do you see where this is going? The fire within the text doesn’t provide enough contrast against the white page (or most other colors of pages) all on its own, and that’s why you created the duplicate text with a contour around its outside to thicken the text.
-
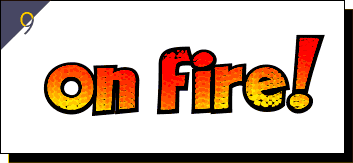
Align the contoured text with the fire text (go to Wireframe display mode if necessary), and if it’s above the fire text, Ctrl+Shift+B will send it back one level of order, while Ctrl+Shift+F will bring it up one level on this page layer. Do you have something that looks fantastic like Figure 9 now? Good, because you’re going to make it even more stupendous with one more step.
-
Select the bottom text, the one with the Contour and then use your keyboard right and down keys to offset the bottom copy by one, perhaps two keystrokes. As you can see in the completed image in Figure 10, the text itself looks a little more cartoonish because of the “drop-shadow you simulated with the contoured copy. The fire is brilliant and with the outline around your work, you can drop this piece into just about any colored background.

I hope you enjoyed and benefited from this month’s tips and tricks tutorial, and I’ve got to get back to work now! I’ve got some fires to put out.
Discuss this tutorial and show the work it inspired in the Xara Xone forum on TalkGraphics.com

was born in the middle of the last century. The son of a sharecropper mother and a bootlegger father who both died when he was five years old in a bizarre accident involving a whiskey still and an eleven foot sack, was raised in a home for wayward children on the banks of the Mississippi Delta.
With this background he was destined to become an Emergency Service Controller for British Gas in Bath, Somerset, England. Because he suffered from an undiagnosed affliction later described by physicians as “a real attitude”, he was pensioned off with some relief by his employers, as he was constantly in hot water for shouting at, and roundly abusing customers on the telephone.
He decided to move to Spain and settled in a remote village in the shadows of the foothills of the Alujarra Mountains, not far from Mecina Alfahar. Whilst out walking one day, he found a discarded copy of Xara Xtreme 5, The Official Guide…the rest is history.
The tutorial Playing with Fire (In a Fun, Harmless way) with Xara including the artwork and the downloadable examples file are Copyright © 2014 Bob Taylor. All Rights Reserved.


