


A Tips and Trick Guest Tutorial by Frances Proctor (angelize)
Xara’s fractal transparencies and fills can be used to create some interesting and varied effects. In this tutorial we are going to explore using layers of fractal fills and transparencies to create clouds, water, stone, wood, and woven fabric. The tutorial is five pages and each page is a mini tutorial. I have also included a .xar file you can download with completed examples that you can pull apart and experiment with.
Step with me into a world of colour and texture, and let the journey begin!
Cloudy Skies
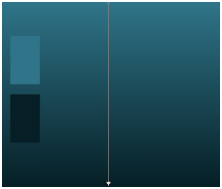
Our cloudy sky begins with a simple rectangle with a linear fill. The colours I have used are shown in the swatches.
![]() Start colour is
H:193.5 S:65.6% V:53.3%
Start colour is
H:193.5 S:65.6% V:53.3%
![]() Start colour
is H:193.5 S:65.6% V:53.3%
Start colour
is H:193.5 S:65.6% V:53.3%
We will build up our skyscape on this background later, but for now you can set it aside. For the next few steps I find it easier to work on the pasteboard so I can see easier.
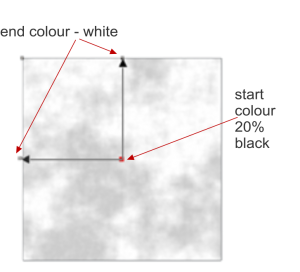 We are going to create a brush to quite literally, paint the sky. Draw a large white rectangle and give it a fractal clouds fill. Now yes, you are still looking at a large white rectangle, change the start colour to 20% black, and now you should have some fractal clouds, but they really aren’t that realistic, because there is very little variation.
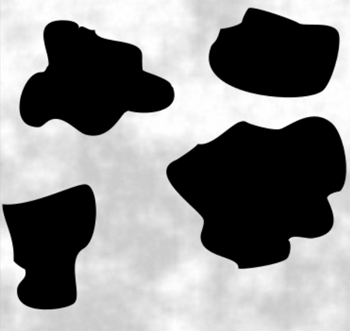 Draw some blobby shapes (about 3 or 4 should do it) on top of this rectangle. Select the rectangle and your shapes and slice them out (I use the keyboard shortcut Ctrl+4 to do this quite quickly).
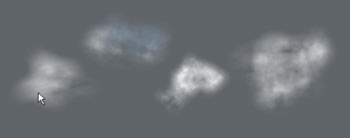
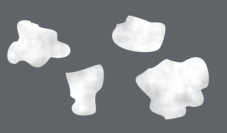 You should now have some blobby cloud like shapes but they still need more variation and some refining.
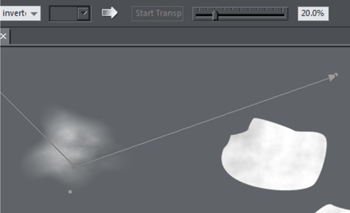 Select one shape and apply a Fractal clouds transparency, select the centre transparency node and set the start transparency to about 20%. Feather the shape until the edges are nice and soft. This is looking much more cloud- like. Continue applying feathering and cloud transparencies to the rest of your shapes. Adjust the fill size and colour on some of them, give one a bit of a blue colour, and vary the transparencies too this will help give our cloud brush more of the variations that you see in real clouds.
Before we create the brush there is still one problem to correct.
 Xara’s brushes don’t support creating brushes with feathered shapes so to get around this, create a bitmap copy of each cloud shape.
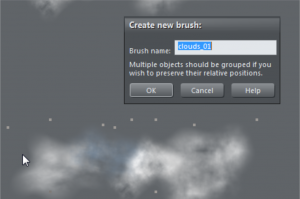
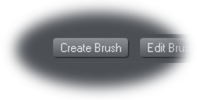 Select the bitmap copies and select the Freehand and Brush tool, click Create Brush and name your brush.
 Draw a line with your new brush, you will notice that it looks quite awful, this is easy to fix. Make sure your line is selected and with the Freehand tool active, click the Edit Brush button on the Info Bar.
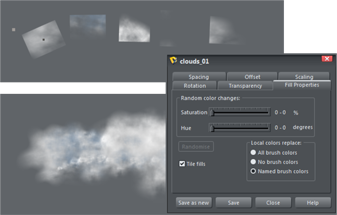
Go to the Fill Properties tab and clear the check mark from Tile Fills. On the Spacing tab, set the Sequence progresses to Random and play with the spacing. On the Scaling tab drag the Random slider all the way to the right. On the Transparency tab set the Transparency to 40%
Experiment with the rest of the settings, most of the tabs have a Random slider, play around with it, and when you are happy with your brush click Save. One of the nice things about this is if you keep your original vector cloud shapes you can go back and change the colours and transparencies on them and create a whole set of cloud brushes. You could have darker colours for stormy skies or clouds tinted with red and pink for sunset skies!
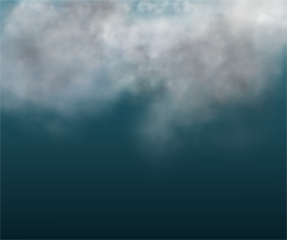 I created two brushes to do this example one lighter and one darker and switched between the two, drawing lines and adding extra transparency to build up the clouds. Once I finished building up my clouds I used Clip View to clip them into the background. I encourage you to experiment with this. I have found every sky I paint is unique and often unexpected images appear Just like the real thing!
Ok now it’s time to pull our heads out of the clouds and dive into the water section!
Ahem, once you have finished groaning we will move on.


