


A Tips and Tricks Tutorial By Gary Bouton(“gare” on online)
Mixing Extrudes and Shapes to Make Molecules
Mixing Extrudes and Shapes to Make Molecules
Two things prompted me to create a tutorial this month on making a simple water molecule using only Xara version 5 or higher. First, if you conduct a search online for “Molecules”, you’ll find one out of two pieces of artwork: “stick figure art that shows atoms and lines connecting them, and that’s it, no color coding, no rendering of perspective—a cocktail napkin doodle, in essence. The other type of molecule drawing is an overly ambitious rendered 3D model, that is so personalized and stylized, it looks more like a balloon animal clowns make than a representation of a molecule.
The other thing is that we all know the Extrude tool, and we use the drawing tools in Xara, however how many of us use them together to make a composition? The tutorial this month here demonstrates how shapes you draw and extrudes you light carefully can coexist and represent a water molecule in a direct and dimensional way everyone can understand and everyone can drink. Figure 1 is a good reference drawing for this assignment (it’s in one of the zip files), and clearly, the basic information about a water molecules is there. Specifically—and it’s good to take note of this stuff because I want you to excel and out-do this basic drawing:
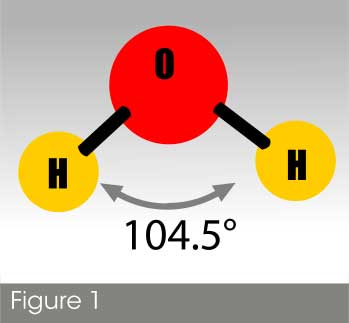
The different atoms are colored differently and they have the periodic table label on them. Good start.
The hydrogen atoms are smaller than the lone oxygen. This too, is a fair representation. Let’s face it, when you travel up the periodic table and create complex molecules such as Phosphoric acid and McDonald’s Secret Sauce, you aren’t going to want to draw every proton, neutron and electron on every atom. So the convention is to make an atom a sphere within the context of drawing molecules. And hydrogen has only one orbiting electron and one core proton. Oxygen on the other hand, has a core of 8 protons and 8 electrons, so the representation of Oxygen as a sphere is going to be larger than a hydrogen sphere.
The arrangement of atoms to make up a molecule is critical to faithfully representing its structure. The hydrogen atoms that are bound to the oxygen atom are at a 104.5 degree angle (although some physicists argue the degree up a notch or two). This is great news and I’ve included a pie wedge that’s 104.5 degrees to help you create a stunningly accurate water molecule.
So let’s get to it!
Extruded circles make the atom “connectors”
Another common notation in physics for the distance relationship between atoms in a molecule is the simple pole or rod.
-
Open Molecule guide.xar. It contains the schematic for the water molecule and the angle you should try to match with your extrudes and shapes.
-
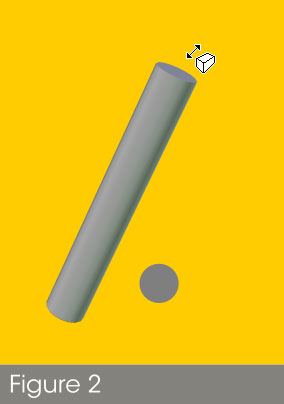
Let’s begin with the atom connectors, the extrudes. This is most easily done in Xara starting with a small grey circle (you can use a different color, but let’s stick to 20 or 30% black for this tutorial); see Figure 2. Select the circle with the Extrude tool and drag on its face. This will produce a cylinder that probably isn’t long enough for the bond between hydrogen and oxygen, and it’s probably at the wrong angle.
-
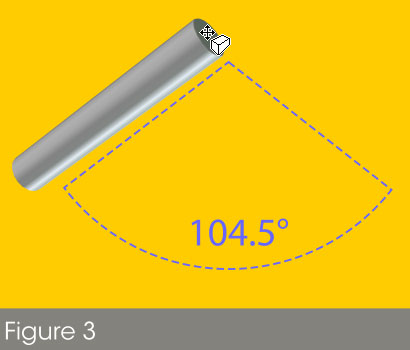
Do this: get your cursor on the side of the cylinder (the extruded section) so the cursor looks like a stretched cube with a double-headed arrow, this is your indication you can drag the top to lengthen the cylinder. Using the pie wedge in the Molecule Guide document, try to both stretch the cylinder, and then get your cursor over the top of the cylinder,; your cursor should change to a distorted rectangle with a four-headed arrow. You can now navigate the rotation of all the angles of the cylinder, and try to get it parallel to the left side of the wedge, and let its top circular side point toward your view a little, as shown in Figure 3.
-
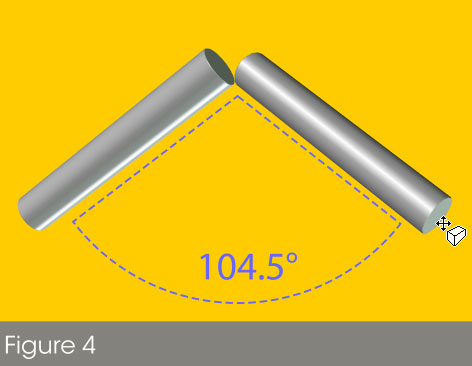
To make the other connector for the second hydrogen bonding to the oxygen, you can drop a copy of the original (right mouse button drag the extruded object to the right, and then release the mouse button) to the other side of the composition. Now it might seem like a chore and a pain to go reversing this connector, but I discovered that if you’re patient and take it slowly, it takes less than 10 seconds to manually drag the circle (the top of the extrude) around in a 180 degree turn, with the bottom circle showing a little like an ellipse, as shown in Figure 4.
Lighting the scene
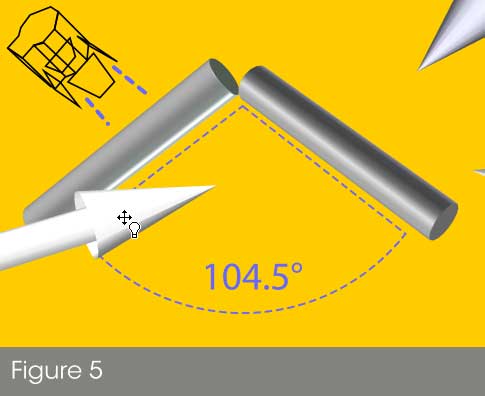
Unless you want to go back to Figure 1, do not pass Go, do not collect pearls of wisdom, we need to halt for a second and decide where the light’s coming from in your illustration. To make it easy this time out, let’s decide that it’s coming into the scene from top right, as my pathetic attempt at drawing a stage light indicates in Figure 5.
.
-
Select one of the connector rods, choose the Extrude tool, and then up on the Infobar you’ll see a light bulb icon on a button that’s not in the “on” position. Click it and you’ll see three overwhelmingly huge arrows enter the scene, one white, one greenish, and the other a dull blue. Xara is a click and drag environment, and although you can direct the three lights using the drop-down list on the Infobar, it’s probably faster to just drag the lights around until you get a vertical highlight on the connector and perhaps an edge of backlighting on the right side of the connector. A bright primary light, and a minor secondary light coming from the opposite direction isn’t always photorealistic, but artistically it does help make round stuff look rounder.
-
First, choose the Ellipse tool from the Toolbar, place your cursor over the junction of the two connectors, and then hold Alt+Shift to draw from the center and constrain the ellipse to a perfect circle. Judge its size according to the scale of the connectors. In my work here, the oxygen is about 1 ¾” across, in proportion to the connectors (at least to my own taste J).
-
Choose the Fill tool, and then choose Circular as the Type from the drop-down on the Infobar. Drag from almost top left to about 5 o’clock at the edge of the circle.
-
What you need to do is create two additional color points on the line that connects the gradient’s beginning with its end. You do this by double-clicking with the Fill tool precisely on the line between the start and end colors—you might want to zoom way in to hit that line to make another color control point.
-
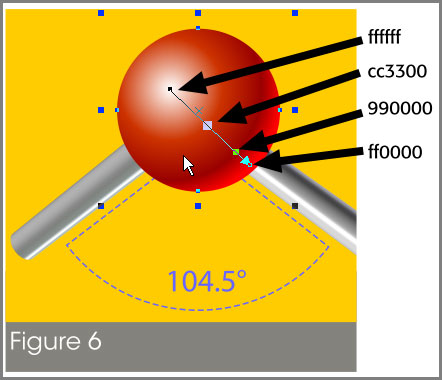
Take a look at Figure 6 for a moment. The easiest way for me to convey the color values I recommend for the oxygen atom is by listing them in hexadecimal code: use ffffff at the start point, cc3300 for the following point moving outward, ff0000 for the next color marker, and for the end marker, use 990000. You might to play with the positions of the markers: use the Fill tool cursor to move the points up and down the line between colors.
-
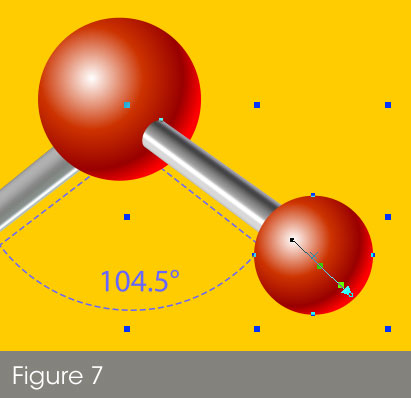
With the Selector tool, choose the oxygen atom, and then right-drag it to the bottom right of the connector rod. You have a duplicate now, but it’s the wrong color, and it’s too large. The “too large” part is easily resolved; you hold Shift and then drag a corner control handle and move it toward the center of the shape, which keeps the shape in its same relative position on the page. See Figure 7.
-
It’s color substitution time! It’s much easier to copy that oxygen atom with that elegant multi-color circular fill, than to start from scratch. The center color point is fine at ffffff (which is white), so we’re going to make a gold-ish orange hydrogen atom now—click the second color mark on the line and with the Color Editor, give this marker a cc3300 hex color. You can copy this text here and just paste it into the Color Editor’s # field, but only if your current color model is RGB or HSV. Greyscale ad CMYK don’t offer hexadecimal values.
-
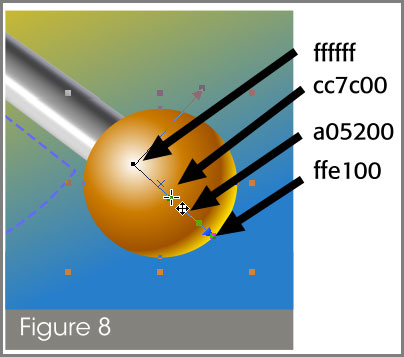
The next-to-last marker should get a 990000 color, and the end color should be ff0000. Fool around with the color markers until you’re happy with the coloration; check out Figure 8. It’s no coincidence that I asked you to use the Extrude lights to cast top left to bottom right; you’re manually recreating the effect with the atoms and the extrudes, and the atoms look very well integrated now. Select the extruded shape and the new atom and then press Ctrl+F to put them to the front of the composition. Notice that the connector looks as though it’s really going through the oxygen atom now, another touch of 3D illustration.
-
Well, deep gold wasn’t a terrific choice of a background for the composition because the hydrogen atom is too close in color, so I tell you what to do; select the background, and then with the fill tool, start at the bottom and drag up, almost diagonally. Click the start marker on the linear gradient line and assign it a medium blue. The illustration might look a little Retro now, but the hydrogen atom is clearly visible now.
-
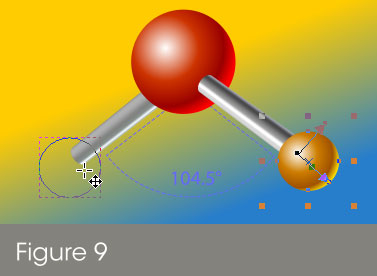
Right-click and drag your finished hydrogen sphere over to the end of the connector at left, as shown in Figure 9, Then release the right mouse button to drop a copy of the hydrogen in its place in this atom.
-
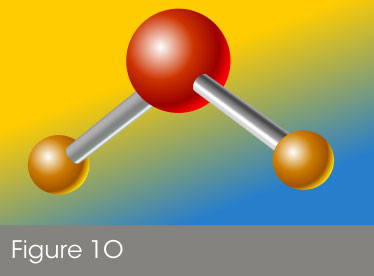
Send the duplicate beck by one step; press Ctrl+Shift+B, and now it looks as though the bottom of the connector is firmly attached to the second hydrogen atom (Figure 10).
Shading the Molecule
So far, you’ve let the Extrude tool do some of the work from you building this molecule, and the gradient tool is fairly self-automated after you give it a few instructions. This is the hard part now: you’re going to manually add a little shading to the oxygen and one of the hydrogen atoms so the objects are in total keeping with the light source. It’s not all that hard if you just follow these steps:
-
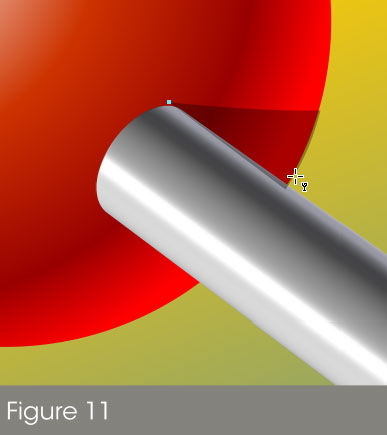
Use the Shape tool or whichever drawing tool you’re comfortable with, and then create a shape similar to that shown in Figure 11, on the oxygen atom. This represents the hiding of light on the atom’s surface by the connector above it. Set its color to black and give it about a 66% transparency, just enough density to allow some of the color of the atom to show through.
-
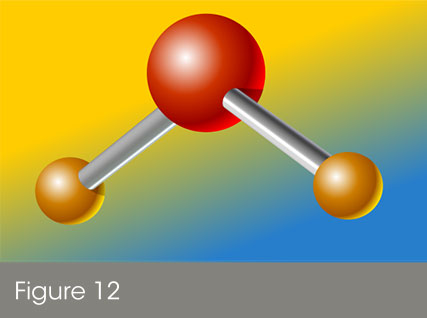
Do exactly the same thing where the connector hides part of the left hydrogen atom, as shown in Figure 12.
You Could Call it Quits now, but…
Notice that in the illustrations of molecules you find in textbooks and on the web, the atoms are labeled: in an H20 molecule, there’s a capital “H” on the bottom guys, and there should be an “O” on the top atom. Follow along here, the steps are fast and fairly simple:
-
Choose an officious-looking typeface, such as Impact, and then Type a capital “H” next to the right, bottom atom.
-
With the eyedropper, choose the deepest brown you can locate on the hydrogen atom so the character “H” takes on this dull shade.
-
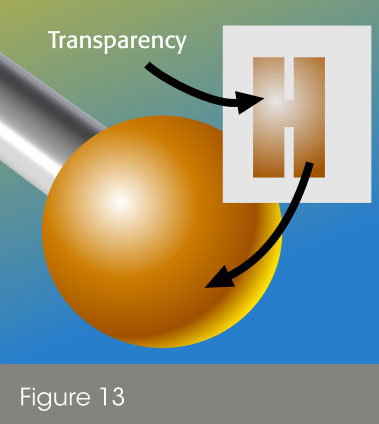
Here’s a good one: you want the character to be on the atom, not simply floating above it, and you know that part of the character will be in the highlight of the atom. Choose the transparency tool, set it for Circular, make the center totally transparent, the outside totally opaque, choose Stained Glass mode for the transparency type on the Property Bar, and then move the center (the start point) so it’s toward the upper left of the character. See Figure 13.
-
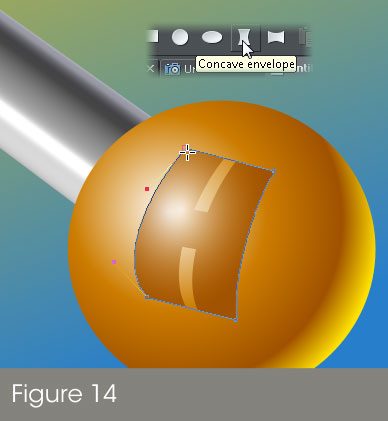
Put the character over the atom, and then choose the Mould tool, and set the Envelope type to Concave. This really messes up the character, but all you need is for the top and bottom of the envelope to be straight; the Shape tool will correct the rest.
-
With the Shape tool, bend the left and right vertical sides a little towards the left, as shown in Figure 14. At this point, Art has t take over from perfect geometry and science. If your Mould looks correct, then artistically it is correct.
-
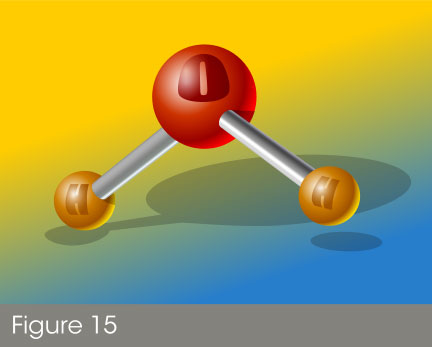
Create the other character label for the remaining hydrogen, and then create an “O” to place above the larger of the three atoms. Don’t be afraid to rotate the character a little. These are spheres and a reference point practically doesn’t exist for surfaces that are spherical, have no background reference point, or other shapes in the scene to suggest the proper angle for the text on the molecule. Figure 15is the finished molecule and it’s in the zip file so you can check it out. I added some ground shading; it took a little bit of thought, but with rods and spheres, the shape of the shadow isn’t that hard to guess.
-
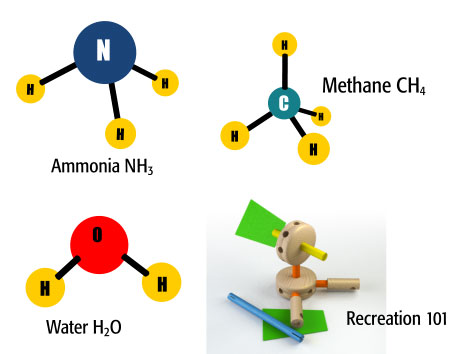
I hope you’ve had fun with the Artistic Side of Science this month, and as an added attraction, I’ve included these shapes for further examination and possibly replication. I’m picking simple molecules, and one I used to play with as a child. Notice that Methane would be a quadruped, except that one of the hydrogen atoms is bound at a slightly longer distance than the other three atoms. In any event, once you’ve mastered ammonia, water, and methane, you can probably scrub the bathroom tiles to a sparkling wonder.
Discuss or ask questions about this tutorial in the Xara Xone forum on TalkGraphics.com.

has been drawing with traditional tools for almost 40 years, and with digital tools such as Xara for close to 20. As large a fan as he is a practitioner, Gary encourages others to express themselves artistically through his writing, the over 25 books on graphics he’s had published, through the videos and tutorials he creates for The Xara Xone, and through his online school, Exclamations. You can send him some email, visit his personal website, or better yet drop on over to the Xara Xone Forum on TalkGraphics and talk to Gary and the rest of the Xara community.
The tutorial Seven Mixing Extrudes and Shapes to Make Molecules including the artwork and the downloadable examples file are Copyright © 2014 Gary Bouton. All Rights Reserved.


